In this tutorial you will learn how to make a track slide and vidwall in a style that's quite close to the one used in the vanilla game's ones.
Stuff you'll need
- GIMP [portable version] - image editor(version 2.10 shown; while you will still be good if you're using the latest version -3.0.4 at the time- you can use the GIMP 3 version of the template instead, which has several filters pre-applied as non-destructive effects)
- My set of track slide/vidwall templates
- FSHTool [download] - QFS/FSH file unpacker/packer, for slides and vidwalls
- OPTI Iambic Heavy Italic font [download]
GIMP's user interface
If you're not famliarized with GIMP, I will give you a quick rundown of the UI so you can get yourself acquainted with it. Here's the default UI for version 2.10

- Toolbox: here's where you will find most of the tools used for editing, like selection, paintbrush, bucket fill, text, etc. By default tools are grouped into several groups (which are indicated by the small arrows on the bottom right of the buttons); to select another tool in the group, right-click on the button to display the available tools in that tool to select them. Also, you can select the foreground and background colors (the black and white squares, respectively)
- Tool options/Information/Undo history/Recent files tabs: for this tutorial we're just going to focus on the Tool options; here's where the selected tool's parameters can be configured.
- Brushes/Patterns/Fonts/Messages tabs: not important for this tutorial.
- Layers/Channels/Paths tabs: here's when you can manage the image layers, channels and paths. We'll just focus on layers and paths.
Step 1: Uncompressing the .qfs files
- Unzip FSHTool into a folder
- Copy the data\feart\slides\t##_00.qfs and the data\feart\vidwall\t##.qfs files from the game's folder into the FSHTool folder
- The ## stands for the track number, here's the list of numbers with their corresponding track:
- Now either drag the .qfs files into the FSHTool.exe file to uncompress them; a new folder with the file name will be generated for each file.
Step 2: Making the slide background image
- Take a screenshot of the track in-game; remember to disable the HUD with F5 first.
- Also I recommend to take it under the highest resolution possible.
- Make sure you have installed the OPTI Iambic Heavy Italic font.
- Unzip the files of the templates to a folder and open the track_slide.xcf file in GIMP. Select the base layer in the trackimg group by clicking on its name in the Layers pane.
- Open the screenshot you took and resize (go to Image > Scale Image) it to 640px wide if neccesary. Then copy it (Ctrl+C) and paste it (Ctrl+V) into the base layer of the template. You'll see there's a white dotted border which is the selection and in the Layers pane there is a Floating Selection layer; that's what we've pasted. Pick the Move (keyboard: M) tool in the toolbox, then click and drag the layer to adjust it; hold Ctrl while dragging to keep it sticked to the image edges.
- When you're done, anchor the selection to the layer below (base) by going to Layer > Anchor Layer (Ctrl+H). You will see the yellow dotted border, which is the layer boundary will change size; we don't want that since we'll need all the layers in that group to have the same size.
- Select the trackimg group by in the Layers pane, then go to Layer > Mask > Mask to selection. Go back to the base layer. You will see the selection now fits the image; now we'll crop it to that selection by going to Layer > Crop to selection. The layer size is now adjusted to the selection.
- It's time to adjust the image contrast; to do so go to Colors > Curves. Adjust the curve a little like this (moving the bottom left point towards the right will make the darkest colors in the image darker and moving the upper right point towards the left will make the brightest colors brighter. When you're done, click OK .
- Copy the layer (Ctrl+C), switch to the blur layer and paste it (Ctrl+V) in there. Now go to Filters > Blur > Zoom Motion Blur. Move the crosshair to set where the blur center will be, adjust the blurring factor between 0.100 and 0.150, and set the Clipping to Clip. Click OK when you're done. Copy (Ctrl+C) the layer, switch to the add+blur layer and paste (Ctrl+V) into it. Also, deselect the selection by pressing Ctrl+Shift+A.
- Switch to the colortint layer, then click on the foreground color in the toolbox to open up the color picker dialog. Click on the HSV button, then pick a color with around 50 S(aturation) and 75 V(alue). Click OK to select it.
Now pick the Bucket Fill (Shift+B) tool and click on the image to paint the layer for the color tint. Then pick a color with 100 Saturation and Value, go to the gradientcolor layer and click right in the middle of it to paint the gradient above and below the track picture. You should end up with a similar result as this:


Step 3: The track name text
- Pick the Text (T) tool in the Toolbox, then go to the <track name> layer and triple-click on it to select all the text; type the track name afterwards, the layer name will change as well.
- Hide the track name layer by clicking on the eye icon next to it, then go the nameshadow layer and change its name like we did with the track name one; if the name goes out of bounds, just place the mouse on the right side of the textbox till you see a small orange rectangle and click on it to automatically adjust the textbox size to the text.
- Unhide the track name layer and go to the textdeg_colorpick layer. Pick the Color Picker (O) tool and click on the white square to set it as the foreground color, then Ctrl+click the cyan square to set it as the background color. Next, pick the Gradient (G) tool, go to the textdeg layer and click-drag over the length of the text, like in the following image. When you're done, press Enter to apply the gradient.
- You can zoom in and out with Ctrl+mouse wheel or with the + - keys


Step 4: The track map
- Take a screenshot of the track map in-game. To do so:
- Set the map to Full Screen and at the farthest zoom possible in Heads Up Display Options
- Start a race, switch to bumper cam and turn 90 degrees facing a dark wall; drive up close to it.
- For better results, set track time to night and turn off your car lights with the L key
- Open the screenshot and pick the Select by Color (Shift+O) tool. Set the threshold to 75 and click on the track map to select it (you might have to zoom in). If there's anything else than the map selected, you can pick the Rectangle Select (R) tool and Ctrl-click and drag to deselect the parts you don't want.
- Go to Select > Grow, set how many pixels you want to grow the selection (that will depend on how big and complex your map is, alongside resolution; I will pick 1px for mine) and click OK. You will see the selection is now thicker
- Pick the Free Select (F) tool, then deselect the parts of the map you don't need by Ctrl-clicking and making a shape around those; press Enter to confirm the deselection. Then bridge the gap that's missing by Shift+clicking, selecting in a way that bridges the gap and press Enter when done
- Go to the Select > To Path, you will see now a red outline lies in place of our selection; that's a path.
- Pick the Elliptical Selection (E) tool and make a selection right where the dot of your car is in the map; Ctrl+drag when making the selection to make a perfect circle; move said selection towards the middle of the path we made if neccesary and make a path out of the selection
- Now go to Layer > New Layer... (Ctrl+Shift+N). Name the layer course and click on OK. Make sure you have white as foreground color (you can reset the default colors by pressing the D key or clicking on the small two squares on the lower left side of the color selector, then switch the foreground/background colors around by clicking on the arrows on the upper right of the color selector or pressing the X key); then switch to the Paths tab and right-click on the path of the track course, click on Fill Path, choose Solid Color and click on Fill. You will see now there's the path is now filled.
- Make a new layer called start and repeat the process with the other path. When you're done, you can hide the paths in the same way you can hide layers. Also, resize the image to 640x480 px if neccesary.
- Copy (Ctrl+C) the course layer, then go back to the template file and paste it (Ctrl+V) into the mapbase layer and anchor it. Then go back to the map file, copy the start layer, paste it in the mapbase layer, but this time press Ctrl+Shift+N to make a new layer out of it.
- Go to the map group, then pick the United Transform (Shift+T) tool and resize (by clicking and dragging the edge handles) and rotate (by clicking and dragging outside the box) the group as needed. When done, press Enter.
- Go to Layer > Crop to Content to crop out the empty space off the map, pick the Alignment (Q) tool and first click on the track image, then Shift+click on the track map. Now press the Align center to target and the Align middle of target buttons to align the track map to the track image.
- Go to the mapbase layer, then go to Filters > Distort > Emboss. Use the settings displayed here and click OK.
- Go to the start layer, lock the alpha channel by click on the 3rd icon to the right of the "Lock" text right over the layer list (it's the checkerboard one), pick the Gradient (G) tool, set the shape to Conical (symmetrical), pick white as foreground color and a dark gray as background color. Click and drag from the center of the start point like in the image and press Enter when done.
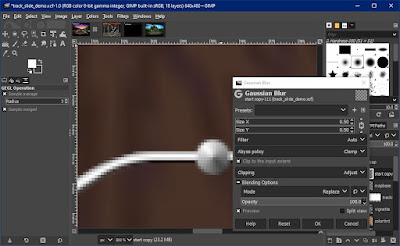
- Go to Filters > Blur > Gaussian Blur and use the settings below to smooth out the start point, click OK to apply the blur.
- Go back to the mapbase layer, go to Layer > Transparency > Alpha to Selection, then go to Select > Grow and grow the selection by 2 or 3 px. Make a new layer called mapshadow and put it below the mapbase layer (by dragging it below it or using the arrow buttons under the layer list). Pick black as the foreground color and paint the selection with the Bucket Fill (Shift+B) tool, deselect everything by pressing Ctrl+Shift+A, then go to Filters > Blur > Gaussian Blur, set a blur of 3 and click OK. Repeat this process with the start layer.
- Make a new layer and name it color, pick a foreground color with 75 saturation and 50 color then use the Bucket Fill (B) tool to color the layer. Set the layer mode to Overlay. We're done with the track slide.
- To save the track slide, go to File > Export (Ctrl+E) or File > Export As (Ctrl+Shift+E). Save it as 0000.bmp in the T##_00 folder of the qfs file you uncompressed with FSHTool. When the export options dialog shows up, use the settings shown below and click on Export


Step 5: Creating the vidwall
- Open the track_vidwall.xcf file, then proceed to make the track image like we did in Step 2; the only difference is that you'll have to resize the track image to 381 pixels wide.
- Pick the Text (T) tool, select the trackname layer, triple-click on it and type the track name. Then pick the Move (M) tool and move the layer towards the middle vertical cyan dotted line (a guide) until the center snaps to it.
- Go to Layer > Transparency > Alpha to Selection, then to Selection > Grow and grow the selection by 5 pixels. Go to the shadow layer, paint it black with the Bucket Fill (Shift+B) tool, deselect everything (Ctrl+Shift+A), then go to Filters > Blur > Gaussian Blur, set the blur to 5 and click OK
- Go to the colortint layer, pick a foreground color with 70 Saturation and 50 Value and paint the layer with the Bucket Fill (Shift+B) tool.
- To save the vidwall, go to File > Export (Ctrl+E) or File > Export As (Ctrl+Shift+E). Save it as 0000.bmp in the T## folder of the qfs file you uncompressed with FSHTool. When the export options dialog shows up, use the settings shown below and click on Export


Step 6: Compiling the .qfs files and setting them in-game
- Go to the T##_00 folder and drag the index.fsh file into the FSHTool executable (you might need to open a second window to do this)
- Go to the T## folder and drag the index.fsh file into the FSHTool executable (you might need to open a second window to do this)
- Copy the t##_00.qfs file and paste it into the data\feart\slides folder of NFSHS (make backups first!)
- Copy the t##.qfs file and paste it into the data\feart\vidwall folder of NFSHS (make backups first!)
See you around!
No comments:
Post a Comment