Thursday, January 5, 2023

How to make NFSHS photo album banner and slides

In this tutorial you will learn how to make the photo album banner and slides for your car in a style that's quite close to the one used in the vanilla game's ones.

    Stuff you'll need


    GIMP's user interface

    If you're not famliarized with GIMP, I will give you a quick rundown of the UI so you can get yourself acquainted with it. Here's the default UI for version 2.10


    1. Toolbox: here's where you will find most of the tools used for editing, like selection, paintbrush, bucket fill, text, etc. By default tools are grouped into several groups (which are indicated by the small arrows on the bottom right of the buttons); to select another tool in the group, right-click on the button to display the available tools in that tool to select them. Also, you can select the foreground and background colors (the black and white squares, respectively)
    2. Tool options/Information/Undo history/Recent files tabs: for this tutorial we're just going to focus on the Tool options; here's where the selected tool's parameters can be configured.
    3. Brushes/Patterns/Fonts/Messages tabs: not important for this tutorial.
    4. Layers/Channels/Paths tabs: here's when you can manage the image layers, channels and paths. We'll just focus on layers. 

    Step 1: Uncompressing the .qfs files

    1. Unzip FSHTool into a folder
    2. Copy the data\showcase\art\<manu>.qfs and the data\showcase\art\sl<car id>##.qfs files from the game's folder into the FSHTool folder
      • <manu> stands for the first 4 digits of the car's manufacturer name in the FEDATA files (i.e. a car with a manufacturer name of "Toyota" would have a "toyo.qfs" file for the banner file)
      • <car id> stands for the car's ID folder name in data\cars (which is often the same as in the FEDATA file -i.e. Ccor-)
      • ## stands for the slide number, starting from 01, copy as many as you need
    3. Now either drag the .qfs files into the FSHTool.exe file to uncompress them; a new folder with the file name will be generated for each file.

    Step 2: Making the logo banner

    1. Unzip the contents of the templates zip file to a folder and open the nfshs_photoalbum_banner_template.xcf file in GIMP. Select the logo layer in the front group by clicking on its name in the Layers pane.


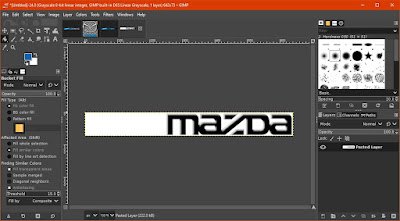
    2. Get a logo with transparency (preferably a black monochrome one) of your car's manufacturer, open it in GIMP, copy it and paste it on the template's logo layer.
      • If you only have access to a black and white logo with no transparency, you can use the Colors > Color to Alpha command to make the background color transparent
      • If your logo comes in other color than black, you can lock the transparency by clicking on the checkerboard button above the layer list and fill it up with black by picking the Bucket Fill (Shift+B) tool and shift clicking on the logo to color it.
      • If the logo is just a part of your source image, you can select it with the Rectangle Select (R) tool, copy it, paste it, unlock the transparency then crop off the empty borders with Layer > Crop to Content, cut it and paste it on the template.


    3. Pick the Unite Transform (Shift+T) tool and resize the layer you pasted until it fits either between the top and bottom or the left and right guides (cyan dotted lines) by clicking and dragging on the squares alongside the logo's border (you can lower the Image Opacity parameter to 50 in the Tool Options pane to help yourself); Ctrl-click and dragging them will resize the layer while keeping it centered. You can also move the layer by just clicking and dragging it. Once you're done, press the Transform button or press the Enter key, then press the anchor button in the layers pane (or press Ctrl+H) to anchor the pasted selection to the layer below. You can zoom in or out as needed with Ctrl+mouse wheel or the +/- keys. Press Ctrl+H to anchor the layer when you're done.


    4. Right-click on the logo layer and click on Alpha to selection, then press Ctrl+I to invert the selection. Select the shadow layer, pick the Move (M) tool, hold Alt and click+drag the selection 3 pixels to the right and bottom. Then, pick the Bucket Fill (Shift+B) tool, select a black color for the foreground and Shift+click on the selection to fill it it with the color.


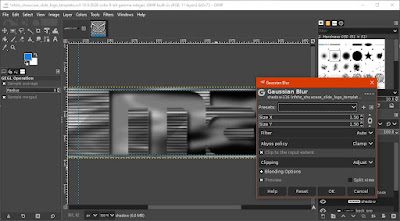
    5. Deselect your selection by pressing Ctrl+Shift+A, then go to Filters > Blur > Gaussian Blur, set these values and click OK to apply the blur.


    6. Select the color layer in the front_grp group, pick the Bucket Fill tool, select the color you want (preferably one that matches your vidwall) and click on the layer to fill it with said color.


    7. Select the color_back layer in the back_grp group, and fill it with a slightly different/darker color.


    8. Hide the front_grp group by clicking on the eye icon next to it, now export the background. To do so, go to File > Export (Ctrl+E) or File > Export As (Ctrl+Shift+E). Save it as 0002.bmp in the <manu> folder of the qfs file you uncompressed with FSHTool. When the export options dialog shows up, use the settings shown below and click on Export.


    9. Hide the back_grp and unhide the front_grp group, then copy the visible image with Ctrl+Shift+C, then paste it into a new image with Ctrl+Shift+V


    10. Go to Layer > Mask > Add Layer Mask, select Transfer layer's alpha channel and click Add


    11. Press Ctrl+X to cut the newly added mask and paste it into a new image with Ctrl+Shift+V


    12. Export the mask image as 0001-a.bmp file in the <manu> folder with these settings


    13. Go back to the pasted image and export it as 0001.bmp file in the <manu> folder with these settings

    14. Go back to the banner template, copy the visible image with Ctrl+Shift+C and paste it into another new image with Ctrl+Shift+V, then go to Layer > Transparency > Threshold Alpha, set the values below and click OK.


    15. Repeat steps 10 through 13 for this one, export the newly pasted mask as 0004-a.bmp and the newly pasted banner as 0004.bmp in the <manu> folder. You're done with the logo banner for both hardware and software versions.

    Step 3: Making the slides

    1. Open the nfshs_photoalbum_slide_template.xcf file in GIMP. Select the image layer, paste the image you want to use for the slide, then use the Unite Transform tool to resize, rotate (by clicking and dragging outside the selection) and place it. When you're done, click on Transform and press Ctrl+H to anchor the layer.


    2. The first slide has the model's logo on it, so go to the logo_main layer and paste the model logo (preferably a white monochrome one) in there, then use the Unite Transform tool to resize it and place it into the upper left corner (using the guides to help yourself place it) and anchor the layer when you're done.


    3. Right-click on the logo_main layer in the Layers pane and click on Alpha to Selection, then go to Select > Grow Selection, select a value of 2 and click OK. Select the logo_shadow layer, pick the Bucket Fill tool, pick a black color and click on the selection to fill it.


    4. Deselect your selection with Ctrl+Shift+A, then go to Filters > Blur > Gaussian Blur, set the values shown below and click OK


    5. Export this first slide. To do so, go to File > Export (Ctrl+E) or File > Export As (Ctrl+Shift+E). Save it as 0000.bmp in the sl<car id>01 folder of the qfs file you uncompressed with FSHTool. When the export options dialog shows up, use the settings shown below and click on Export.


    6. To make the rest of the slides, hide the logo group, then select the image layer and repeat step 1, but instead of anchoring the layer, make the newly pasted image into a new layer by pressing Ctrl+Shift+N. Then export the slide as 0000.bmp in each remaining sl<car id>## folder with the settings above.

    Step 4: Compiling the logo and slide files and setting them in-game

    1. Go to the <manu> and each sl<car id>## folder, then drag the index.fsh file into the FSHTool executable (you might need to open a second window to do this)
    2. Copy the <manu> and sl<car id>##.qfs files and paste them into the data\showcase\art folder of NFSHS

    And that's it! This is how you can make NFSHS-styled photo albums. Hope this tutorial has been helpful. 


    See you around!


    Tuesday, January 3, 2023

    How to make NFS3 photo album slides

    In this tutorial you will learn how to make photo album slides for your car in a style that's quite close to the one used in the vanilla game's ones.

      Stuff you'll need

      • GIMP [portable] - image editor 
      • My NFS3 photo album templates
      • FSHTool -JimD's version- [download] - QFS/FSH file unpacker/packer, for slides and vidwalls; JimD's version allows for packing resized bitmaps without having to edit the index.fsh file for that

      GIMP's user interface

      If you're not famliarized with GIMP, I will give you a quick rundown of the UI so you can get yourself acquainted with it. Here's the default UI for version 2.10


      1. Toolbox: here's where you will find most of the tools used for editing, like selection, paintbrush, bucket fill, text, etc. By default tools are grouped into several groups (which are indicated by the small arrows on the bottom right of the buttons); to select another tool in the group, right-click on the button to display the available tools in that tool to select them. Also, you can select the foreground and background colors (the black and white squares, respectively)
      2. Tool options/Information/Undo history/Recent files tabs: for this tutorial we're just going to focus on the Tool options; here's where the selected tool's parameters can be configured.
      3. Brushes/Patterns/Fonts/Messages tabs: not important for this tutorial.
      4. Layers/Channels/Paths tabs: here's when you can manage the image layers, channels and paths. We'll just focus on layers. 

      Step 1: Uncompressing the .qfs files

      1. Unzip FSHTool into a folder 
      2. Copy the FEDATA.FSH you extracted and at least 2 fedata\art\showcase\sl<car id>##.qfs file from the game's folder into the FSHTool folder.
        • <car id> stands for your car's FEDATA ID (i.e. F355)
        • The ## stands for the slide number, 01 is the first slide which is styled differently from the rest and it's what enables the photo album feature for your car.
        • Copy more sl<car id>##.qfs if you want to add more slides
      3. Now drag the files you copied into the FSHTool.exe file to uncompress them; a new folder with the file name will be generated for each file. 


      Step 2: Making the first slide

      1. Unzip the contents of the templates zip file to a folder and open the nfs3_photo_1st_slide_template.xcf file in GIMP. Select the wheel layer in the back group by clicking on its name in the Layers pane.


      2. Get an image of your car's side (focusing on it's wheels, preferably), open it in GIMP, copy it and paste it on the template's wheel layer


      3. Pick the Unite Transform (Shift+T) tool and resize the layer you pasted until the wheel covers both top and bottom of the area between the base (and then some) by clicking and dragging on the squares alongside the logo's border (you can lower the Image Opacity parameter to 50 in the Tool Options pane to help yourself); Ctrl-click and dragging them will resize the layer while keeping it centered. You can also move the layer by just clicking and dragging it. Once you're done, press the Transform button or press the Enter key, then press the anchor button in the layers pane (or press Ctrl+H) to anchor the pasted selection to the layer below. You can zoom in or out as needed with Ctrl+mouse wheel or the +/- keys.


      4. Adjust the contrast by going to Colors > Curves. Make sure it's set to Value and move the points to adjust brightness and contrast; lower-left point controls the darker colors -if you move it upwards it will make the dark colors brighter; if you move it towards the right it will make them darker- and the upper-right one controls the brightest colors -if you move it downwards it will make them darker; if you move it towards the left it will make them brighter-. Click OK to apply the adjustments. Right click on the wheel layer and click on Layer to Image Size when you're done.
        • You can also add points by clicking in any point of the curve and dragging for more precise control.


      5. Select the color layer and pick the Bucket Fill (Shift+B) tool; then pick the foreground color of your preference (I will be picking the #ffc44c [HSV 40,70,100] color for this one) and click anywhere on the layer to color it.


      6. Select the make_bg layer, then get a logo with transparency (preferably a black monochrome one) of your car's manufacturer, open it in GIMP, copy it and paste it on the template's make_bg layer. Then pick the Unite Transform (Shift+T) tool, then resize and move the logo to the left and middle of the background. Once you're done, press the Transform button or press the Enter key, then anchor the pasted selection to the layer below.
        • If you only have access to a black and white logo with no transparency, you can use the Colors > Color to Alpha command to make the background color transparent
        • If your logo comes in other color than black, you can lock the transparency by clicking on the checkerboard button above the layer list and fill it up with black by picking the Bucket Fill (Shift+B) tool and shift clicking on the logo to color it.
        • If the logo is just a part of your source image, you can select it with the Rectangle Select (R) tool, copy it, paste it, unlock the transparency then crop off the empty borders with Layer > Crop to Content, cut it and paste it on the template.


      7. Select the car layer and paste a pic of your car in there, preferably a front 3/4 angle pic of it. Then use the Unite Transform (T) tool to resize, rotate (by clicking and dragging outside of the selection) and move the car layer to the lower right zone (right up to rear wheel going past the image edge) , then anchor the layer with Ctrl+H. Then adjust the contrast with Colors > Curves.
        • You'll need a pic with transparency (that means, without background) of the car you're making for this one. You can use GIMP's own Foreground Select and Quick Mask features to select the image's foreground, then invert the selection and delete the background. There are also background removal apps such as the one provided by DepositPhotos that you can use.
        • You can also apply curves in different channels (such as red, green, blue, alpha, etc) for different effects, like I did here: I changed the image tone using the rim color as a base (if you click on a part of the image while in the Curves dialog it will pick the color you clicked on as a sample which will displayed as a vertical line) and reduced the blue channel value while raising the values on the red channel to make the image tone match the background.


      8. Select the mk layer in the make group, paste the manufacturer's wordmark (word logo) into it, use the Unite Transform tool to resize it and move to near the upper left corner and anchor it with Ctrl+H. Then lock the transparency by clicking the third upper button in the Layers pane, pick the Bucket Fill tool, choose a HSV 0 0 50 gray, hold Shift and click on the layer to paint it entirely with gray.


      9. Duplicate the mk layer with the Duplicate button (the one pointed at with a red arrow) on the Layers pane, press F2 and rename the layer to mk_shine, then move it under the mk layer on the Layers pane by either dragging or clicking on the Move Layer Down button (the one pointed at with a green arrow). Pick the Bucket Fill tool, pick a white color for the foreground and Shift+click to paint it all white. Pick the Move (M) tool, then Shift+click and drag the layer 1 px to the top and left.


      10. Repeat the above process for the shadow, but painting it with off-black (HSV 0,0,5) and moving it 1px to the bottom and right


      11. Hide the make group by clicking on the eye icon next to it. Repeat steps 9 and 10 for the model group layers, but with the model's logo


      12. Select the color layer of the logos group, pick the Bucket Fill tool, select a foreground color (I will be picking #ffc44d [HSV 40, 70, 90]) and click on the layer to paint it


      13. Hide the logos group. You're done with the first slide, but now you'll have to export it's parts (background, model logo and make logo)


      14. To save the background, go to File > Export (Ctrl+E) or File > Export As (Ctrl+Shift+E). Save it as 0000.bmp in the sl<car id>01 folder of the qfs file you uncompressed with FSHTool. When the export options dialog shows up, use the settings shown below and click on Export

      15. Unhide the logos group, hide the model group within it and unhide the make group. Pick the Rectangle Select (R) tool and select the upper left area where the logo is.


      16. Copy the visible selection with Ctrl+Shift+C and paste it as a new image with Ctrl+Shift+V. Export the newly pasted image as 0002.bmp in the sl<car id>01 folder with the same settings as the previous step.


      17. Go back to the template file and repeat steps 15 and 16 for the model logo


      Step 3: Making the rest of the slides

      1. Open the nfs3_photo_slides_template.xcf file in GIMP. Select the image layer.


      2. Open the pic you want to use as a slide, go to Image > Scale Image and resize it to 640 pixels wide.


      3. Copy the image, go back to the slide template and paste it over the image layer, then pick the Move tool and Ctrl+drag (to move it alongside the image's edges) the image up or down until your desired position.


      4. Press Ctrl+Shift+N to make your pasted image into a new layer.


      5. To save the slide, go to File > Export (Ctrl+E) or File > Export As (Ctrl+Shift+E). Save it as 0000.bmp in a sl<car id>## folder of the qfs files you uncompressed with FSHTool. When the export options dialog shows up, use the settings shown below and click on Export


      6. Repeat this process for each additional slide you want to make.
         

      Step 4: Compiling the logo and slide files and setting them in-game

      1. Go to each sl<car id>## folder and drag the index.fsh file into the FSHTool executable (you might need to open a second window to do this)
      2. Copy the sl<car id>##.qfs files and paste them into the fedata\art\showcase folder of NFS3

      And that's it! This is how you can make NFS3-styled photo albums. Hope this tutorial has been helpful. 


      See you around!