In this tutorial you will learn how to make the showcase and history files for your car in a style that's quite close to the one used in the vanilla game's ones.
Stuff you'll need
- GIMP [portable] - image editor (version 2.10 shown; while you will still be good if you're using the latest version -3.0.4 at the time- you can use the GIMP 3 version of the template instead, which has several filters pre-applied as non-destructive effects)
-
My NFS3 showcase/history template toolkit
GIMP's user interface
If you're not familiarized with GIMP, I will give you a quick rundown of the UI so you can get yourself acquainted with it. Here's the default UI for version 2.10

- Toolbox: here's where you will find most of the tools used for editing, like selection, paintbrush, bucket fill, text, etc. By default tools are grouped into several groups (which are indicated by the small arrows on the bottom right of the buttons); to select another tool in the group, right-click on the button to display the available tools in that tool to select them. Also, you can select the foreground and background colors (the black and white squares, respectively)
- Tool options/Information/Undo history/Recent files tabs: for this tutorial we're just going to focus on the Tool options; here's where the selected tool's parameters can be configured.
- Brushes/Patterns/Fonts/Messages tabs: not important for this tutorial.
-
Layers/Channels/Paths tabs: here's when you can manage the image layers, channels and paths. We'll just focus on layers.
Step 1: Making the showcase backgrounds
- Unzip the contents of the toolkit to a folder and open the nfs3_his_show_template.xcf file in GIMP. Select the rim_back layer in the base group by clicking on its name in the Layers pane.
- Get an image of your car's side (focusing on it's wheels, preferably), open it in GIMP, copy it and paste it on the template's rim_back layer

- Pick the Unite Transform (Shift+T) tool and resize the layer you pasted until you fill the most of the right quadrant by clicking and dragging on the squares alongside the logo's border (you can lower the Image Opacity parameter to 50 in the Tool Options pane to help yourself); Ctrl-click and dragging them will resize the layer while keeping it centered. You can also move the layer by just clicking and dragging it. Once you're done, press the Transform button or press the Enter key, then press the anchor button in the layers pane (or press Ctrl+H) to anchor the pasted selection to the layer below.

- Adjust the contrast by going to Colors > Curves. Make sure it's set to Value and move the points to adjust brightness and contrast; lower-left point controls the darker colors -if you move it upwards it will make the dark colors brighter; if you move it towards the right it will make them darker- and the upper-right one controls the brightest colors -if you move it downwards it will make them darker; if you move it towards the left it will make them brighter-. In this case, use values similar to the pic below since we need to make the dark areas lighter. Click OK to apply the adjustments. Right click on the rim_back layer and click on Layer to Image Size when you're done.
- You can also add points by clicking in any point of the curve and dragging for more precise control.

- Select the logo_back layer, then get a logo with transparency (preferably a black monochrome one) of your car's manufacturer, open it in GIMP, copy it and paste it on the template's logo_back layer.
- If you only have access to a black and white logo with no transparency, you can use the Colors > Color to Alpha command to make the background color transparent
- If your logo comes in other color than black, you can lock the transparency by clicking on the checkerboard button above the layer list and fill it up with black by picking the Bucket Fill (Shift+B) tool and shift clicking on the logo to color it.
- If the logo is just a part of your source image, you can select it with the Rectangle Select (R) tool, copy it, paste it, unlock the transparency then crop off the empty borders with Layer > Crop to Content, cut it and paste it on the template.

- Pick the Unite Transform (Shift+T) tool, then move and resize the logo into place; you can also rotate the logo by clicking and dragging outside it and if you Shift-click and drag outside the logo, you can rotate the logo in 15 degree steps. Once you're done, press the Transform button or press the Enter key, then anchor the pasted selection to the layer below.

- Adjust the brightness and contrast of the logo going to Colors > Curves. Make sure there aren't black areas in the blending areas with the rim_back layer to avoid transparency issues. When you're done, click OK. Deselect your selection with Select > None (Ctrl+Shift+A). Right click on the logo_back layer and click on Layer to Image Size when you're done.

- Select the car layer of the general group and paste a pic of your car in there, preferably a front 3/4 angle pic of it.
- You'll need a pic with transparency (that means, without background) of the car you're making for this one. You can use GIMP's own Foreground Select and Quick Mask features to select the image's foreground, then invert the selection and delete the background. There are also background removal apps such as the one provided by DepositPhotos that you can use.

- You'll need a pic with transparency (that means, without background) of the car you're making for this one. You can use GIMP's own Foreground Select and Quick Mask features to select the image's foreground, then invert the selection and delete the background. There are also background removal apps such as the one provided by DepositPhotos that you can use.
- Use the Unite Transform (T) tool to resize and move the car layer into place using the bottom guide (cyan dotted line) to guide yourself, then anchor the layer with Ctrl+H. Then adjust the contrast with Colors > Curves with settings similar to the ones of the pic below

- Select the car_shadow layer, then pick the Free Select (F) tool and make a selection by placing points where roughly where the shadow would be placed -don't worry about making it perfect because it will be blurred anyway-. Either connect the points all the way to the end or press Enter to make the selection active. Next, pick the Bucket Fill (Shift+B) tool and fill the selection with a black color.

- Deselect your selection and go to Filters > Blur > Gaussian Blur, set a strength of 5.00 in both X and Y and click OK to apply it.

- Hide the general group with the by clicking on the eye icon next to it. Select the car layer of the performance group and paste another front 3/4 picture of your car (preferably one of it moving) in it; resize it and move it with the Unite Transform tool, adjust contrast like we did with the car in the general group and anchor the layer.
- You can also adjust the color tone if needed by applying curves in different channels (such as red, green, blue, alpha, etc) for different effects, like I did here: I changed the image tone using the rim color as a base (if you click on a part of the image while in the Curves dialog it will pick the color you clicked on as a sample which will displayed as a vertical line) and reduced the red channel value while raising the values on the blue channel to make the image tone match the background.

- You can also adjust the color tone if needed by applying curves in different channels (such as red, green, blue, alpha, etc) for different effects, like I did here: I changed the image tone using the rim color as a base (if you click on a part of the image while in the Curves dialog it will pick the color you clicked on as a sample which will displayed as a vertical line) and reduced the red channel value while raising the values on the blue channel to make the image tone match the background.
- Create the shadow in the car_shadow layer like we did for the one in the general group

- Select the smoke_b layer, pick the Airbrush (A) tool, pick a white color for the foreground color, then pick the Grunge 01 brush and set the Rate and Flow values to the ones you see on the screenshot. Paint over where the smoke cloud would be 3 times, each time a bit smaller than the last one. When you're done, go to Filters > Blur > Gaussian Blur and apply a blur of 8.00

- Select the smoke_f layer, paint a smaller cloud and blur it in the same manner as the previous step, then pick the Eraser (Shift+E) tool, select the 2. Hardness 25 brush and erase some of the smoke covering the wheel. You can zoom in or out as needed with Ctrl+mouse wheel or the +/- keys.

- If you couldn't get a front 3/4 pic of your car in movement, you could do the following:
- Select the car layerm pick the Ellipse Select (E), select the "face" of wheel, pick the Unite Transform tool and set Transform: to Selection (the second button). Use the diamond points to shape the selection to the wheel shape and press Transform or the Enter key

- Go to Filters > Blur > Circular Motion Blur, place the center (the cross shape) on the wheel center and set an angle of 10-15. Click on OK to apply the blur.

- Deselect your selection, pick the Smudge (S) tool, pick the 2. Hardness 25 brush, a size of 10 and smudge the tire tread downward a little.

- Repeat the process for the front wheel

- Select the car layerm pick the Ellipse Select (E), select the "face" of wheel, pick the Unite Transform tool and set Transform: to Selection (the second button). Use the diamond points to shape the selection to the wheel shape and press Transform or the Enter key
- Hide the perfomance group and perform the same steps as we did in the general layer with a "cutaway" style image of your car. If can't get one of those, you can use an image of the engine, forgo the shadow layer and use the Eraser tool with the 2. Hardness 25 brush and a size of 200 to erase the unneeded surroundings. You're now done with the showcase elements.


Step 2: Making the showcase backgrounds
- For the history files you can either reuse the showcase background or create a dedicated background for it that has a few more details (basically the founders/influential people in the manufacturer's history); if you go for the latter, copy the contents of the rim_back and the logo_back layers of the base group into their base_his counterparts, then hide the show group. Move the logo layer a bit to the right and down to make room for the next part.

- Select the his_keypeople layer in the keypeople group and paste the pic of company founder/key figure; then press Ctrl+H to anchor the layer.

- Select the his_keypeople_shadow layer, pick the Paintbrush (P) tool with the 2. Hardeness 25 brush and size 100, then paint right where the shadow would be. When your done, go to Filters > Blur > Gaussian Blur and apply a blur with strength of 5.

- Go to the his_car_grp group. Work on the his_car and his_car_shadow layers like we did previously for the showcase ones.

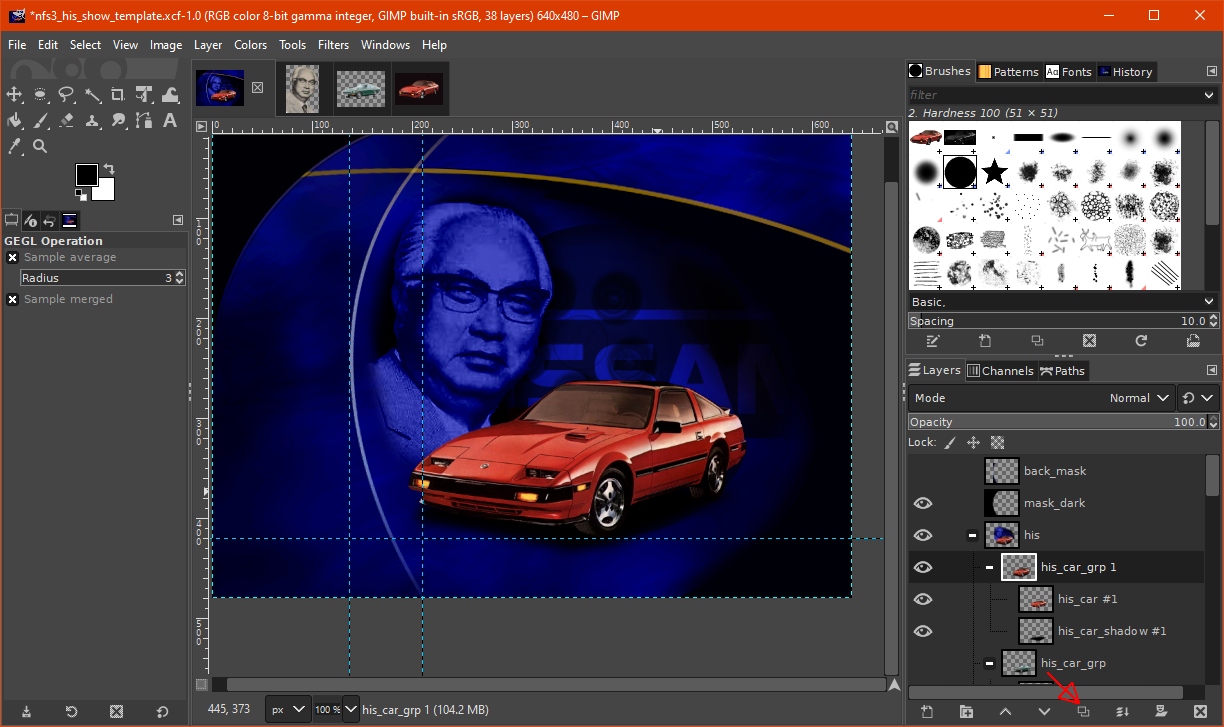
- If you need to add another car to the history files, you can duplicate the his_car_grp group by right-clicking on the group and clicking Duplicate Layer or pressing the Duplicate button (pointed below). Then hide the his_car_grp group, delete the contents of the duplicate layers in the duplicate group by pressing Delete on each and repeat the process. You're now done with the history elements.


Step 3: Exporting the images and compiling
- We'll begin with the showcase elements; first hide the his group and unhide the base and show groups, then in the show group hide all groups except for general. Unhide the back_mask layer, pick the Rectangle Select (R) tool and mark a selection from the past the right and top edges of the image to the leftmost guide as shown (the select tool will snap to the guide), then press Ctrl+Shift+C to copy all visible layers.

- Press Ctrl+Shift+V to paste our copied data into a new image. This is going to be the background (bgn) part of the general section of the showcase.

- Go to File > Export (Ctrl+E) or File > Export As (Ctrl+Shift+E). Look for the bitmaps\show folder of the toolkit and save the file as gen_bgn.bmp. When the export options dialog shows up, use the settings shown below and click on Export.
- Go back to the template file, hide the back_mask layer, deselect your selection, pick the Rectangle Select (R) tool and mark a selection from the past the left and top edges of the image to the rightmost guide, copy the visible layers with Ctrl+Shift+C and paste it as a new image with Ctrl+Shift+V. Export it as gen_msk.bmp in the bitmaps\show folder of the toolkit like we did for the gen_bgn.bmp file, with the same settings as before. This is going to be the mask (mask) part of the general section of the showcase.

- Repeat the above process with the performance and mechanical layers of the template; you should export for those as the following:
- per_bgn.bmp & per_msk.bmp for the performance elements
-
mech_bgn.bmp & mech_msk.bmp for the mechanical elements
- For the history elements, first hide the show group (and if you have a dedicated background for the history sections, the base group) and unhide the his group and repeat the process for each of the his_car_grp groups. For each of the his_car_group elements you should export them as bk##.bmp for the background and mk##.bmp for the mask, both should be exported to the bitmaps\his folder.
- The ## part of the name indicates the year of the element in the history section of the fedata, each one is called by the last 2 digits in the fedata history string, so for example, for the green 1969 Fairlady Z to appear correctly in the history section, the entries for its background and mask should be named BK69 and MK69, respectively, in addition to the fedata history string ending in "69" (i.e. "Fairlady Z - 1969")
- The ## part of the name indicates the year of the element in the history section of the fedata, each one is called by the last 2 digits in the fedata history string, so for example, for the green 1969 Fairlady Z to appear correctly in the history section, the entries for its background and mask should be named BK69 and MK69, respectively, in addition to the fedata history string ending in "69" (i.e. "Fairlady Z - 1969")
- To compile the files, run the compile.bat file and follow the prompts; when it's done, open the showcase folder that appears in the newly created _output folder of the toolkit. Move the files in there to the fedata\art\showcase folder of NFS3 and boot the game to enjoy the showcase and history sections you made!


That's it for this tutorial, see you around!


