Saturday, December 1, 2018

How to convert a NFSMW modloader car to add-on car

First of all:
This tutorial is intended only for mods you created or personal use. Do not attempt to upload cars converted from other authors as yours without prior permission since we can tell whether a car is stolen by looking at meshes, file sizes and hashes. You have been warned.

Things you will need:

  • NFSMW Unlimiter [download] - needed to make add-on cars work properly.
  • NFS-CarToolkit [download] - tool to compile car geometry and textures
  • Binary [download] - edits GlobalB.lzc, FrontB.lzc, language files and others
  • VLTEd [download] - edits VLT database
  • NFSTexEd 1.7 [download] - import/extract textures from .bin/.bun/.lzc files

Optional:

  • AntRenamer [download | portable] - a little useful program for renaming multiple files
  • MWInside's ReCompiler v190609 [download] - recompiles models and textures, adds cars to globalb.bun/lzc, logos to fronta.bun, strings to language files. (however, for adding cars it's being deprecated in favor of Binary)
    • Base files for ReCompiler by nlgzrgn [download] - basic file structure for recompiler
  • Save Patcher by MWInside [download] - to patch existing saves with addon cars
    • NFS-Hasher [download] - to calculate the hashes needed for the ini file

Note: the bracketed (< >) terms are meant to be substituted without brackets (duh) and respecting their own capitalization. So for example <MANUFACTURER> is substituted for HONDA and <color> gets substituted by green

Step 1: File Structure

Make sure to install you have installed the NFSMW Unlimiter first or the add-on cars won't work properly

If you're going to add cars with Binary & CarToolkit

Skip to Step 2, there's no need for set up folders if you use Binary & CTK.

If you're going to add cars with Binary & Recompiler (for when CarToolkit can't open geometry files)

Unzip the Recompiler and recompiler base files in a folder. There are also a few files and folders that should be created or added as shown here:


  • <OLD_XNAME> is the original car's xname -duh- (ie: PUNTO)
    • Config.ini contents are the following:
      [INFO]
      NewName = <XNAME>

The logo files can be extracted from the FRONTEND\MANUFACTURERS\<##>-<MANUFACTURER>.BIN (if it has one) and CARS_REPLACE\<XNAME>\SECONDARYLOGO.BIN with NFS TexEd.

Now proceed to step 2

If you're going to add cars with Ed The Car Dealer (deprecated method)

Download Ed The Car Dealer [download] first

Unzip the Recompiler and recompiler base files in a folder. There are also a few files and folders that should be created or added as shown here:


  • <OLD_XNAME> is the original car's xname -duh- (ie: PUNTO)
    • Config.ini contents are the following:
      [INFO]
      NewName = <XNAME>

Unzip the Ed files into another folder. There's a lot of files and folders for Ed, but these are the ones we need:


  • <XNAME>.ini contents are the following (taken directly from the example file):
    // Rename the file as CARNAME.ini, CARNAME being the folder name (XName) you use for your add-on car.

    [INFO]
    Manufacturer = FORD // Type your manufacturer name here. (15 characters max.)
    //Class = Racing // (Added for ReCompiler intercompatibility. You can either use this or the 2 values below.) Racing, Racers, Player, Cop, Cops, Traffic, BigTraffic, HugeTraffic
    UsageType = 0 // 0 = Racer, 1 = Cop, 2 = Traffic, 3 = Wheels, 4 = Universal
    CarMemType = Racing // Racing, Player, Cop, Traffic, BigTraffic, HugeTraffic
    Skinnable = 1 // 0 = Uses own skin (CARNAME_SKIN1), 1 = Supports Paint & Vinyls.
    DefaultBasePaint = GLOSS_L1_COLOR17 // GLOSS_L1_COLOR01 (01-80) / METAL_L1_COLOR01 (01-80) / PEARL1_PAINT (1-20) / CHROME01_PAINT (01-10) / MATTE01_PAINT (01-10) / TRAFFIC_L1_COLOR01 / COP_L1_COLOR01

    [SPOILER]
    SpoilerSet = SPOILER // SPOILER, SPOILER_CARRERA, SPOILER_HATCH, SPOILER_PORSCHES
    AutosculptSpoilerSet = SPOILER_AS2 // SPOILER_AS2, SPOILER_CARRERA_AS2, SPOILER_HATCH_AS2, SPOILER_PORSCHES_AS2 (not used in MW)

    [COLLISION]
    CopyFrom = MUSTANGGT // Select any collision data to copy. Use any sentinel value to ignore copying.

    [RESOURCES]
    Description = Write your description here. // This will appear in Ed.
    Label = CARNAME_MANUFACTURER_MODEL // String label for your new car. Replace MANUFACTURER and MODEL according to your FrontEnd VLT entry.
    Name = Car Name // This will be your car's name.
    Color charts for reference:

  • <MANUFACTURER> (i.e.: FORD) and <FRONTEND_NAME> (i.e: MUSTANGGT) refer to the manufacturer and frontend nodes of the car in VLT, it's recommended to leave the frontend name the same as the xname to avoid confusion
    • The dds files can be extracted from the FRONTEND\MANUFACTURERS\<##>-<MANUFACTURER>.BIN (if it has one) and CARS_REPLACE\<XNAME>\SECONDARYLOGO.BIN with NFS TexEd.

If you're going to add cars with ReCompiler (even more deprecated method)

Unzip the Recompiler (get the old version first, unzip it and then unzip the new version over the old one) and recompiler base files in a folder. There are also a few files and folders that should be created or added as shown here:


  • <OLD_XNAME> is the original car's xname
    • Config.ini contents are the following:
      [INFO]
      NewName = <XNAME>
  • <MANUFACTURER> (i.e.: FORD) and <FRONTEND_NAME> (i.e: MUSTANGGT) refer to the manufacturer and frontend nodes of the car in VLT, it's recommended to leave the frontend name the same as the xname to avoid confusion
    • The dds files can be extracted from the FRONTEND\MANUFACTURERS\<##>-<MANUFACTURER>.BIN (if it has one) and CARS_REPLACE\<XNAME>\SECONDARYLOGO.BIN with NFS TexEd. However they can't be used as-is; open them up in a image editor (such as GIMP [portable]) and save them as DXT3 with no mipmaps.
  • <XNAME>.ini contents are the following

    [INFO]
    Manufacturer = <MANUFACTURER>
    Class = Racers / Cops / Traffic
    Color = <color hash (w/o spaces)>
    • Color hashes are the following:

      GLOSS PAINT :

      COLORS 1-20 (FIRST ROW):

      E2 BD BC B8 1/80
      E3 BD BC B8 2/80
      E4 BD BC B8 3/80
      E5 BD BC B8 4/80
      E6 BD BC B8 5/80
      E7 BD BC B8 6/80
      E8 BD BC B8 7/80
      E9 BD BC B8 8/80
      EA BD BC B8 9/80
      02 BE BC B8 10/80
      03 BE BC B8 11/80
      04 BE BC B8 12/80
      05 BE BC B8 13/80
      06 BE BC B8 14/80
      07 BE BC B8 15/80
      08 BE BC B8 16/80
      09 BE BC B8 17/80
      0A BE BC B8 18/80
      0B BE BC B8 19/80
      23 BE BC B8 20/80

      COLORS 21-40 (SECOND ROW):

      24 BE BC B8 21/80
      25 BE BC B8 22/80
      26 BE BC B8 23/80
      27 BE BC B8 24/80
      28 BE BC B8 25/80
      29 BE BC B8 26/80
      2A BE BC B8 27/80
      2B BE BC B8 28/80
      2C BE BC B8 29/80
      44 BE BC B8 30/80
      45 BE BC B8 31/80
      46 BE BC B8 32/80
      47 BE BC B8 33/80
      48 BE BC B8 34/80
      49 BE BC B8 35/80
      4A BE BC B8 36/80
      4B BE BC B8 37/80
      4C BE BC B8 38/80
      4D BE BC B8 39/80
      65 BE BC B8 40/80

      COLORS 41-60 (THIRD ROW):

      66 BE BC B8 41/80
      67 BE BC B8 42/80
      68 BE BC B8 43/80
      69 BE BC B8 44/80
      6A BE BC B8 45/80
      6B BE BC B8 46/80
      6C BE BC B8 47/80
      6D BE BC B8 48/80
      6E BE BC B8 49/80
      86 BE BC B8 50/80
      87 BE BC B8 51/80
      88 BE BC B8 52/80
      89 BE BC B8 53/80
      8A BE BC B8 54/80
      8B BE BC B8 55/80
      8C BE BC B8 56/80
      8D BE BC B8 57/80
      8E BE BC B8 58/80
      8F BE BC B8 59/80
      A7 BE BC B8 60/80

      COLORS 61-80 (FOURTH ROW):

      A8 BE BC B8 61/80
      A9 BE BC B8 62/80
      AA BE BC B8 63/80
      AB BE BC B8 64/80
      AC BE BC B8 65/80
      AD BE BC B8 66/80
      AE BE BC B8 67/80
      AF BE BC B8 68/80
      B0 BE BC B8 69/80
      C8 BE BC B8 70/80
      C9 BE BC B8 71/80
      CA BE BC B8 72/80
      CB BE BC B8 73/80
      CC BE BC B8 74/80
      CD BE BC B8 75/80
      CE BE BC B8 76/80
      CF BE BC B8 77/80
      D0 BE BC B8 78/80
      D1 BE BC B8 79/80
      E9 BE BC B8 80/80

      METALLIC PAINT :

      COLORS 1-20 (FIRST ROW):

      4D 88 F2 C7 1/80
      4E 88 F2 C7 2/80
      4F 88 F2 C7 3/80
      50 88 F2 C7 4/80
      51 88 F2 C7 5/80
      52 88 F2 C7 6/80
      53 88 F2 C7 7/80
      54 88 F2 C7 8/80
      55 88 F2 C7 9/80
      6D 88 F2 C7 10/80
      6E 88 F2 C7 11/80
      6F 88 F2 C7 12/80
      70 88 F2 C7 13/80
      71 88 F2 C7 14/80
      72 88 F2 C7 15/80
      73 88 F2 C7 16/80
      74 88 F2 C7 17/80
      75 88 F2 C7 18/80
      76 88 F2 C7 19/80
      8E 88 F2 C7 20/80

      COLORS 21-40 (SECOND ROW):

      8F 88 F2 C7 21/80
      90 88 F2 C7 22/80
      91 88 F2 C7 23/80
      92 88 F2 C7 24/80
      93 88 F2 C7 25/80
      94 88 F2 C7 26/80
      95 88 F2 C7 27/80
      96 88 F2 C7 28/80
      97 88 F2 C7 29/80
      AF 88 F2 CF 30/80
      B0 88 F2 C7 31/80
      B1 88 F2 C7 32/80
      B2 88 F2 C7 33/80
      B3 88 F2 C7 34/80
      B4 88 F2 C7 35/80
      B5 88 F2 C7 36/80
      B6 88 F2 C7 37/80
      B7 88 F2 C7 38/80
      B8 88 F2 C7 39/80
      D0 88 F2 C7 40/80

      COLORS 41-60 (THIRD ROW):

      D1 88 F2 C7 41/80
      D2 88 F2 C7 42/80
      D3 88 F2 C7 43/80
      D4 88 F2 C7 44/80
      D5 88 F2 C7 45/80
      D6 88 F2 C7 46/80
      D7 88 F2 C7 47/80
      D8 88 F2 C7 48/80
      D9 88 F2 C7 49/80
      F1 88 F2 C7 50/80
      F2 88 F2 C7 51/80
      F3 88 F2 C7 52/80
      F4 88 F2 C7 53/80
      F5 88 F2 C7 54/80
      F6 88 F2 C7 55/80
      F7 88 F2 C7 56/80
      F8 88 F2 C7 57/80
      F9 88 F2 C7 58/80
      FA 88 F2 C7 59/80
      12 89 F2 C7 60/80

      COLORS 61-80 (FOURTH ROW):

      13 89 F2 C7 61/80
      14 89 F2 C7 62/80
      15 89 F2 C7 63/80
      16 89 F2 C7 64/80
      17 89 F2 C7 65/80
      18 89 F2 C7 66/80
      19 89 F2 C7 67/80
      1A 89 F2 C7 68/80
      1B 89 F2 C7 69/80
      33 89 F2 C7 70/80
      34 89 F2 C7 71/80
      35 89 F2 C7 72/80
      36 89 F2 C7 73/80
      37 89 F2 C7 74/80
      38 89 F2 C7 75/80
      39 89 F2 C7 76/80
      3A 89 F2 C7 77/80
      3B 89 F2 C7 78/80
      3C 89 F2 C7 79/80
      54 89 F2 C7 80/80


      CUSTOM PAINT codes:

      PEARL PAINT
      COLORS 1-20 (FIRST ROW)

      5F 80 0D 08 1/40
      20 BD 07 55 2/40
      E1 F9 01 A2 3/40
      A2 36 FC EE 4/40
      63 73 F6 3B 5/40
      24 B0 F0 88 6/40
      E5 EC EA D5 7/40
      A6 29 E5 22 8/40
      67 66 DF 6F 9/40
      0F BD D4 0B 10/40
      D0 F9 CE 58 11/40
      91 36 C9 A5 12/40
      52 73 C3 F2 13/40
      13 B0 BD 3F 14/40
      D4 EC B7 8C 15/40
      95 29 B2 D9 16/40
      56 66 AC 26 17/40
      17 A3 A6 73 18/40
      D8 DF A0 C0 19/40
      F0 91 16 F8 20/40

      CHROME PAINT
      COLORS 21-30 (SECOND ROW)

      B9 74 2E 8F 21/40
      7A B1 28 DC 22/40
      3B EE 22 29 23/40
      FC 2A 1D 76 24/40
      BD 67 17 C3 25/40
      7E A4 11 10 26/40
      3F E1 0B 5D 27/40
      00 1E 06 AA 28/40
      C1 5A 00 F7 29/40
      D9 0C 76 2E 30/40

      MATTE PAINT
      COLORS 31-40 (SECOND ROW)

      F6 11 32 79 31/40
      B7 4E 2C C6 32/40
      78 8B 26 13 33/40
      39 C8 20 60 34/40
      FA 04 1B AD 35/40
      BB 41 15 FA 36/40
      7C 7E 0F 47 37/40
      3D BB 09 94 38/40
      FE F7 03 E1 39/40
      16 AA 79 18 40/40

  • Contents of CARNAME_<MANUFACTURER>_<FRONTEND_NAME>.ini are the following:

    [INFO]
    Name = <new car name>
    • Delete all language files except for the one that corresponds to your game's language before compiling, otherwise your carname won't appear.

Once you have all the files set up, proceed to the next step

Step 2: (Re)Compiling Geometry/Textures and adding the GlobalB/Frontend/Language data

If you're going to add cars with Binary

If you're using CarToolkit to recompile the geometry and textures

Open NFS-CarToolkit and open the GEOMETRY.BIN file you want to recompile by going to File > Open.

Make sure to check that the Export > Config-free when possible menu option is checked and click on the Export tab. 


If you wish, set the path of the game's executable (e.g. C:\Games\NFS Most Wanted\speed.exe) in the EXE Path field; otherwise, uncheck the Auto checkbox next to the Output folder field and click on the 3-dot button to select the folder where you want to place the recompiled GEOMETRY.BIN and TEXTURES.BIN files.

In the Export tab, select the Game (Need for Speed Most Wanted), Car type (Racer, Cop, Traffic) and in Car name type the new XNAME for your car (e.g.CHALLENGER)

Click on the GEOMETRY.BIN and TEXTURES.BIN buttons. If successful, it will display a File exported in #ms: <filepath> in green in the log below.

If you didn't set an EXE Path, click the folder button next to the Output folder field to open the folder where your GEOMETRY.BIN and TEXTURES.BIN files are and copy them to the CARS\<XNAME> folder (you have to create it) of NFSMW.

If you're using Recompiler to recompile the geometry and textures

Open the NfSMW - ReCompiler program. This window will show up.


Run the CARS -> <OLD_XNAME> option. If it goes well you will hear a confirmation sound.

With TexEd, open the TEXTURES.BIN file that has been generated and save it to compress it.

Then put the newly generated GEOMETRY and TEXTURES files in the CARS\<XNAME> folder (you have to create it) of NFSMW.

Now open Binary and click on Launch Binary for Modders (right big button)


Go to Main > New Launcher


Select your game folder with the Select Directory button, specify the usage to Modder and the game to MostWanted. Click on Save to save the launcher script

Open the launcher file (it has an .end extension) with some plaintext editor (like notepad) and add the following highlighted text. Save the file.

(obviously, if your game is in another language, you have to put the name of the the appropiate language file of the LANGUAGES folder)
Back in Binary, open the launcher file by going to Main > Load Files. You will see a few nodes appearing in the left-side panel


Open the GLOBAL\GLOBALB.LZC node and open the CarTypeInfos node. Click on an existing node and click Copy Node to make a new node from an existing one


Enter the XNAME of the new node and press OK. It will be added to the bottom of the list


Go to the newly selected node. The values we're going to be looking for is in the Primary section. Adjust as necessary.


  • DefaultBasePaint [string]: the stock car color. Values are:
    • GLOSS_L1_COLOR## (where ## is any number from 01 to 80 in the color chart below)
    • METAL_L1_COLOR## (where ## is any number from 01 to 80 in the color chart below)
    • PEARL1_PAINT## (where ## is any number from 01 to 20 in the color chart below)
    • CHROME01_PAINT## (where ## is any number from 01 to 10 in the color chart below)
    • MATTE01_PAINT## (where ## is any number from 01 to 10 in the color chart below)
    • TRAFFIC_L1_COLOR01
    • COP_L1_COLOR01
  • IsSkinnable [True/False]: Determines if the car uses paintable car skin material or not (racers use the former, cops/traffic the latter)
  • ManufacturerName [string]: Manufacturer the car is going to use. Refer to the the NFSMWUnlimiterSettings.ini file for a list of manufacturers.
  • MemoryType [Cop/Traffic/Player/Racing/HugeTraffic/BigTraffic]: Determines memory type usage for the car
  • UsageType [Racer/Cop/Traffic/Wheels/Universal]: What kind of mesh the car uses

Now open the Collisions node and copy the node from another one like we did in CarTypeInfos


Open the DBModelParts node and copy another node (preferably the one of the car that was being replaced) like we did before


Double-click on the newly created node, this screen will appear


We need to rename all the nodes here to make the add-on model work, to do that in one shot go to Car Parts > Find and Replace, input the XNAME to replace (A4, for this instance), click OK, then input the new XNAME (in this example it would be COROLLA) and hit OK. The next prompt will ask you if you want to make the replace case-sensitive; leave it unchecked and click OK. Now the nodes will have the correct name as shown below


Close the window to go back to the main Binary window

Now open the FRONTEND\FRONTB.LZC node, open the TPKBlocks node and double-click on the FRONTENDTEXTURES (or DEFAULT, if you modified the FrontB with TexEd before) node. The following window will appear.


Go to Texture > Add Texture and open the secondary logo .dds file. In the next prompt input the name of the texture, which in this case would be SECONDARY_LOGO_<XNAME>, like in the example below and click OK:

Do the same for the manufacturer logo if the mod already had one has one, the name for those are CARSELECT_MANUFACTURER_<MANUFACTURER> (i.e. CARSELECT_MANUFACTURER_FERRARI). Close the window to get back to the main window.

Open the LANGUAGES\English.bin (or whatever language file you picked), open the STRBlocks node and double-click on the GLOBAL node, this window will open:


Go to String > Add String. In the following dialog put the car name label name in Label (CARNAME_<MANUFACTURER>_<FRONTENDNAME>) and the label text, as shown in the pic below and click OK


Close the window to go back to the main window

If the mod uses special spoilers, you can set them up by going to GLOBAL\GLOBALB.LZC > SlotOverrides and adding/copy one of the existing nodes to set it.


Once you're done, go to Main > Save Files to save changes

If you're going to add cars with Ed The Car Dealer (deprecated method)

Open the NfSMW - ReCompiler program. This window will show up.


Run the CARS -> <OLD_XNAME> option. If it goes well you will hear a confirmation sound.

With TexEd, open the TEXTURES.BIN file that has been generated and save it to compress it.

Then put the newly generated GEOMETRY and TEXTURES file in the CARS\<XNAME> folder of NFSMW.

Next, open Ed, select Main > Open and open your NFSMW folder. You should see the .ini file corresponding to your car. To add it, just click on the "Add Cars" button and you're done.


If you're going to add cars with ReCompiler (even more deprecated method)

Open the NfSMW - ReCompiler program. This window will show up.

Now proceed to run the following options:

  • FRONTEND > FRONTEND
  • GLOBAL > GLOBALB
  • LANGUAGE
  • CARS > [OLD_XNAME]
You will hear a confirmation sound every time an operation has been successful

With TexEd, open the TEXTURES.BIN file that has been generated and save it to compress it.

Now put the files in their corresponding game folders (don't forget to make backups first!)

  • GLOBALB.BUN/.LZC -> GLOBAL
  • FRONTA.BUN -> FRONTEND
  • <LANGUAGE>.BIN -> LANGUAGES
  • GEOMETRY.BIN, TEXTURES.BIN -> CARS\[XNAME]

Step 3: VLT Editing

Open VLTEd and go to File > Open; select your NFSMW folder. You will see the VLT nodes like this:
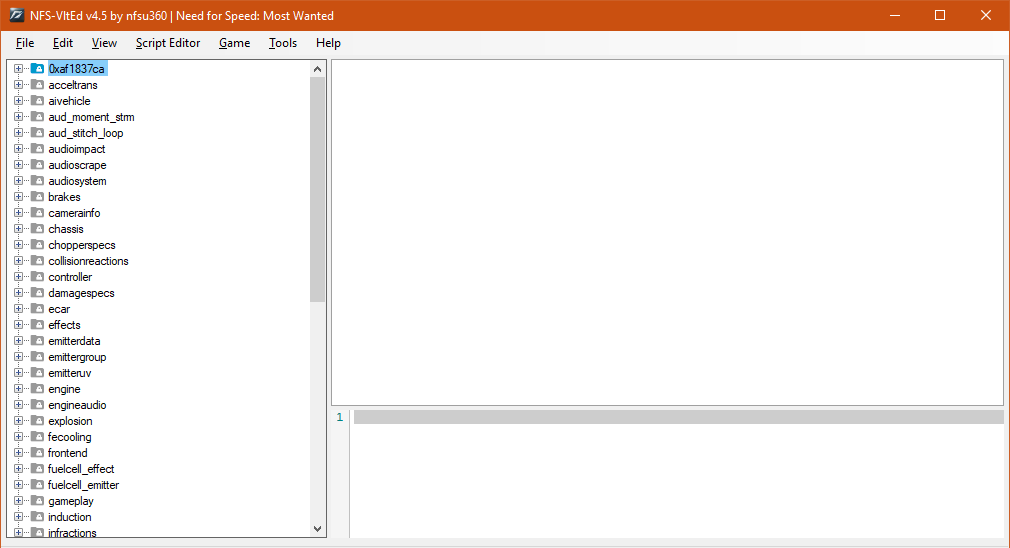
You will need to create new nodes for the addon car, but it's better to copy an existing one since creating a new one is rather buggy. And since we're dealing with a car from modloader, it's better to copy them from the original car it's replacing. Normally that would be a tedious process, but I prepared a script that will cut some work; just copy and paste the following script into a text editor (Notepad will do), replace the bracketed names as suggested (for example, <added_xname> to mustanggt and so on) and save it as <addon_car>.nfsms:

copy_node brakes <original_xname> default <added_xname>
copy_node brakes <original_xname>_top <added_xname> <added_xname>_top
copy_node chassis <original_xname> default <added_xname>
copy_node chassis <original_xname>_top <added_xname> <added_xname>_top
copy_node ecar <original_xname> racers <added_xname>
copy_node frontend <original_manufacturer> <region> <added_manufacturer>
copy_node frontend <original_xname> <manufacturer> <added_xname>
copy_node engine <original_xname> default <added_xname>
copy_node engine <original_xname>_top <added_xname> <added_xname>_top
copy_node induction <original_xname> default <added_xname>
copy_node induction <original_xname>_top <added_xname> <added_xname>_top
copy_node pvehicle <original_xname> racers <added_xname>
copy_node tires <original_xname> default <added_xname>
copy_node tires <original_xname>_top <added_xname> <added_xname>_top
copy_node transmission <original_xname> default <added_xname>
copy_node transmission <original_xname>_top <added_xname> <added_xname>_top
copy_node camerainfo <original_xname>_hood hood <added_xname>_hood
update_field pvehicle <added_xname> MODEL Visual <MODEL_XNAME (IN ALL CAPS)>
update_field pvehicle <added_xname> MODEL Collision <MODEL_XNAME (IN ALL CAPS)>
update_field pvehicle <added_xname> MODEL Collision64 <MODEL_XNAME (IN ALL CAPS))>
update_field pvehicle <added_xname> transmission[0] Collection <added_xname>
update_field pvehicle <added_xname> transmission[1] Collection <added_xname>_top
update_field pvehicle <added_xname> tires[0] Collection <added_xname>
update_field pvehicle <added_xname> tires[1] Collection <added_xname>_top
update_field pvehicle <added_xname> induction[0] Collection <added_xname>
update_field pvehicle <added_xname> induction[1] Collection <added_xname>_top
update_field pvehicle <added_xname> frontend Collection <added_xname>
update_field pvehicle <added_xname> engine[0] Collection <added_xname>
update_field pvehicle <added_xname> engine[1] Collection <added_xname>_top
update_field pvehicle <added_xname> chassis[0] Collection <added_xname>
update_field pvehicle <added_xname> chassis[1] Collection <added_xname>_top
update_field pvehicle <added_xname> brakes[0] Collection <added_xname>
update_field pvehicle <added_xname> brakes[1] Collection <added_xname>_top

*some induction nodes have _base attached to it, that's for cars that don't come with turbo/supercharger, in that case the nodes related to induction will be the following:

copy_node induction <original_xname>_base default <added_xname>_base
copy_node induction <original_xname>_top <added_xname>_base <added_xname>_top
update_field pvehicle <added_xname> induction[1] Collection <added_xname>_base
update_field pvehicle <added_xname> induction[2] Collection <added_xname>_top

**some induction nodes have only the _top node, mostly for high-tier cars, in that case the nodes related to induction will be the following:
copy_node induction <original_xname>_top default <added_xname>_top
update_field pvehicle <added_xname> induction[1] Collection <added_xname>_top

*** if you're adding the car GLOBALB entry with Binary or Ed, set the <XNAME> in the Collision and Collision64 lines as the XNAME of the added car. If you're adding the car GLOBALB entry with ReCompiler, you have to change the Collision and Collsion64 lines to another original car XNAME; your car might float above/sinking on the ground so it might take a few tries to get it right.

Back to VLTEd, import the .nfsms file with File > Import > ModScript. Click Install in the following dialog.

Next, import the the FE.MWPS file of the modloader car with File > Import > MWPS. Click "Import", then OK. You will see the script editor pane (lower right quadrant) now has some commands, but we need to make a slight change: delete the line that contains "manufacturer" since that has to be taken care later (if there is any).

Now import the ATTRIBUTES.MWPS file. However MWPS import is not perfect and you will notice there might be some errors as noted in the import results window; scroll down to check what those might be.

For example, here it says "No value has been found at offset"; in this case it refers to the gear count value in the transmission node, which can be fixed by right-clicking on the car's transmission node, selecting "edit fields" and changing the GEAR_RATIO count to the desired value. Also some values like the copspeech and engine/turbo sounds might not be imported at first; you could either check if those have any other type than dword next to patch in their lines in the MWPS file in Notepad and try importing it again or change them manually in VLTEd

Click OK, then copy the contents of the script editor and paste them into a text editor. Replace the xname of the original car for the addon car, copy the whole thing; open the .nfsms file with the text editor and paste the copied script at the bottom of script file, save the script.

Back to VLTEd, reload the file to undo changes and import the script again. Now, change the missing values (engine/turbo sounds, copspeech, etc.) if any and then go to the frontend node of the added car (and added manufacturer, if there is any). For versions of Unlimiter previous to v4, set the manufacturer number according to the Unlimiter list in the .ini (you can add manufacturers to the ini file and use them as well).

[Manufacturers]
1 = BMW
2 = FORD
3 = SUBARU
4 = PORSCHE
5 = AUDI
6 = MAZDA
7 = GENERAL_MOTORS
8 = DODGE
9 = TOYOTA
10 = MITSUBISHI
11 = MCLAREN
12 = MERCEDES
13 = NISSAN
14 = LOTUS
15 = LAMBORGHINI
16 = RENAULT
17 = LEXUS
18 = PONTIAC
19 = CHEVROLET
20 = VAUXHALL
21 = ASTONMARTIN
22 = VOLKSWAGEN
23 = FIAT
24 = CADILLAC
25 = CORVETTE
26 = ACURA
27 = ALFAROMEO
28 = BENTLEY
29 = BUGATTI
30 = CATERHAM
31 = CHRYSLER
32 = FERRARI
33 = FORDSHELBY
34 = HONDA
35 = HUMMER
36 = INFINITI
37 = JAGUAR
38 = JEEP
39 = KOENIGSEGG
40 = LANCIA
41 = MARUSSIA
42 = MASERATI
43 = MINI
44 = NFS
45 = OLDDODGE
46 = PAGANI
47 = PLYMOUTH
48 = SCION
49 = SEAT
50 = SHELBY
51 = SRT
52 = TERLINGUA
53 = RENAULT_SPORT
54 = FORD_UK
55 = ARIEL
56 = HOLDEN
100 = PALMONTPD
101 = ROCKPORTPD
102 = TRUCK
103 = FIRETRUCK
104 = VAN
105 = COPTER
106 = TRAFFIC
      

Once when you're done, save, export the script (overwrite the old one) and clear the script editor window. Now try out your new add-on car by creating a new save! (or by patching an existing save -see below-)

Optional step 1: Vinyls

If the car came with vinyls, you can convert those for addon use.

Using Binary

Load the launcher file you made before if you haven't and load the VINYLS.BIN file you want to use by typing new negate <path to your VINYLS.BIN file> (e.g. new negate CARS\CIVIC\VINYLS.BIN or new negate "C:\My Files\VINYLS.BIN"), in the script pane (the bottom right panel), then press F5 to load it.

Open the VINYLS.BIN you loaded and open the TPKBlocks section and select the node on it. Change its CollectionName value to <XNAME>_VINYLS (e.g. CAVALIER_VINYLS), then click on Open Editor or double click on the node


In the Editor window, go to Options > Find and Replace, enter in the "search for field" the XNAME you want to change, click OK; then in the "replace with" field type the new XNAME you want to use, click OK. In the following dialog you can leave the "make case-sensitive search" option unchecked, and click OK. You will see the names of the vinyls changed. 


However, in some cases not all vinyls will change name properly through Find and Replace; sort the vinyls by name by click on the CollectionName headed and check if there are names that are either unchanged or truncated; fix their names by selecting them and changing their CollectionName value. Close the editor window when done.

To save the file, type delete <path to your VINYLS.BIN file> in the script pane and press F5. Keep on mind this might take a few minutes, so don't panic if you see Binary freeze in the meantime.

Using TexEd & AntRenamer (deprecated)

First export the vinyls with TexEd to a folder. Then open AntRenamer and add the folder containing the exported vinyls.

Then click on "Actions", go to "String replacement", in "Search for" put the XNAME you want to change and in "Replace by" put the new XNAME you want to use (in this example PUNTO vinyls are converted to SENTRAB13)

Click Go and check if all the files were renamed correctly, correct if neccessary.

Download this vinyls_base file, rename it to vinyls.bin and open it with Tex-Ed. Go to Texture > Add from folder, select the folder containing the vinyls and click OK. Save the file (it might take a couple of minutes) to finish.

Optional step 2: Patching save to use add-on cars

In case you're not in the mood to make a new save every time you add a new car, you can patch an existing save file. Keep on mind to make a backup of the original save because you cannot remove cars from save files. Also, it will break existing cars in My Cars, Career Garage and Bonus Cars in versions of Unlimiter prior to v4.

Unzip the Save Patcher to a folder. The folder structure should be like this


And the contents of the <XNAME>.ini file are the following:
[MAIN]
frontend = <hashed frontend name>
pvehicle = <hashed xname>

You will need NFS-Hasher to hash the frontend and xnames. Open it up and in the "Input Text" field type the frontend name, then click the "Copy" button next to "VLT File". Paste the hashed name in the frontend and remove the "0x" in front of it. Do the same for the xname/pvehicle line and save.

Now run the NfSMW - SavePatcher program, open Patch Save and click on the save you want to patch. You will hear a confirmation sound if done correctly.

Finally, open the NFSMW Save Editor, open the patched save and save it to make it work. You're done!

Hope you found this tutorial useful, cya!

Saturday, May 19, 2018

VLTedit (MWPS Editing) For Dummies (old modtools)

VLTedit for dummies [VLTedit research update #3]

Tired of the same old slow performance but like how the car looks? Fed up with stock cars being totally lame? Mod car you just downloaded is still slow but at least doesn't look like brick? It can all be changed using only one program. VLTedit is the key to success here.

Stuff necessary for whole modding to work:

Arushan's Ferrari 360 Mod - http://nfscars.net/file/view/mostwanted/6464.aspx Updated VLTedit with extracted databases [also by Arushan] - enclosed to post Notepad, understanding and some patience :P

1) If the car you want to mod is a downloaded custom car then skip steps 2 and 3.

2) Go to CARS directory in your NFS MW installation folder. Use this list for reference if you're not sure which car folder contents you should use. After ascertaining which dir holds data for the car you're looking for, copy the entire folder named as the car you found in the list, go to folder named ADDONS, then go to CARS_REPLACE and paste the folder copied from CARS directory. Example as follows - you think that Lexus IS300 sucks [generally does anyway] and you want to soup it up. Go to CARS folder, find folder IS300, copy it, go to ADDONS/CARS_REPLACE and paste the copied IS300 folder.

3) In the ADDONS/CARS_REPLACE/car-name folder create 3 additional files. First make sure that you can see file extensions. Open any folder, click Tools menu, go to View tab, and [if necessary] uncheck box 'Hide extensions for known file types'. Files that you need to create in the copied car directory: ATTRIBUTES.mpws , CAR.ini, FE.mpws Now you can start some modding. Car I will use for demonstration purposes will be the above mentioned Lexus IS300.

4) Unpack contents of VLTedit.zip some place you'll be able to find it and quickly access. Open vltedit.exe. Blank program window will appear. Click File menu in the upper right and click 'Open'. Window will pop up asking about file. Choose 'db.vlt' and click OK. Data will load after few seconds and 'Database' node will appear on the left side. Click [+] sign to expand database nodes. You'll see a long list of nodes that define all performance and visual aspects of in-game cars. Nodes containing performance related values are: 'brakes', 'chassis', 'engine', 'induction', 'tires' and 'transmission'. 'Ecar' node controls stuff like wheel positioning and visual ride height. 'Pvehicle' controls mass, engine sounds, what performance related components like engine, tires or induction are used and determines how many upgrades can be installed and also what cops call all the cars in game. Other nodes shouldn't be really modified unless you really know what you're doing. Otherwise your game might crash, act in a weird way or not load at all.

5) Main idea behind performance modding is that game uses hexadecimal offsets to define physics, movement, acceleration, top speed and particle system like N2O smoke, exhausts, or even cop lights. Mod uses appropriate files [above mentioned ATTRIBUTES.mwps, FE.mwps] to overwrite game defaults in order to change hex offsets. Most frequently used offsets are those controlling how car wheels are positioned since there are barely any cars that have identical section or track width. But that isn't the only thing that can be overwritten using offset patching [that's how the process is called].

Structure of .mwps files looks as follows:

patch <value_type> bin:0x<hex_offset> <value>

Example with Lexus IS300 having mass changed:

Node: pvehicle/default/cars/racers/is300 ; Field 'MASS' ; default value is 1547

Note that VLTedit displays offset below the black window listing values for currently selected field.

patch float bin:0x31598 1100

The above patching script will modify the mass of IS300 in game. Using this sequence any game value can be changed. Value types are: float [most common] - any number ranging -65000 up to +65000; also decimal numbers; byte - for numbers 0-16; word - same as above [used only to define gear count] dword - for certain offsets to use offset packs [collections] example:

Node: pvehicle/default/cars/racers/is300 ; Field 'engineaudio [0]' patch dword bin:0x31724 0x8db4a27

This will make the unupgraded Lexus use engine sounds from Ferrari 360. Go to node engineaudio/default for reference. Note that pvehicle 'engineaudio' field uses certain nodes in engineaudio node for cars and entire pack needs to be defined. Proper offset for desired audio set can be obtained by typing the following in the text field in the bottom of program window [click proper node first to make sure that correct hash will be listed]: hash fer_360

hash(fer_360)=0x8db4a27

This will give the needed hash to be used use with dword value type. Note that offset to patch audio was bin:0x31724 although bin:0x31720 was displayed. This is because 'Collection' value needs to be patched; not the 'Class'. VLTedit will only show offset for first value in the selected field. To check which offset you need to patch open calculator [view needs to be set to scientific], switch to hexadecimal mode [hotkey F5], type the offset [without 0x], add 4 and press Enter to get the result. Step for offsets is always 4 so 2nd value is +4, 3rd is +8, etc.

Also there is a possibility to make appropriate comments for each offset for user convenience. Example:

## engine audio patch dword bin:0x31724 0x8db4a27

Any character(s) put after ## will be ignored during data parsing and can be used for naming sections for more organized view.

6) Now that you're familiarized with basics of VLTedit, it's time to do some hex modding. Following will be demonstration using modified offsets for STOCK Lexus Is300. It's recommended that all .mwps files [ATTRIBUTES and FE] are blank before proceeding with this demonstration since overlapping offset might cause the game parse mod data incorrectly and crash it or it might not load at all. Mistakes are costly...

As for CAR.ini it's necessary that it contains the following text [below is text needed for IS300 modifications to take effect]:

[car] name=Lexus IS300 manufacturer=lexus internal=is300 modloader=0.2

'name' can be anything you want, manufacturer is asociated with FE.mwps which will be explained in details later, internal needs to exactly the name of directory that the mod car replaces; if it's for example Mercedes SLR then internal will be slr, modloader value is always 0.2

WARNING!!! It's very important that files: ATTRIBUTES.mwps, CAR.ini and FE.mwps are present in the directory. All BIN files like TEXTURES and GEOMETRY also need to be in the folder. Otherwise there won't be any changes in the game or the game might crash.

Before creating any entries in the ATTRIBUTES.mwps file it's suggested but not essential to add the following two lines on the top:

memfile GLOBAL\GlobalMemoryFile.bin vpak GLOBAL\ATTRIBUTES.BIN db

This should allow offset patching to be possible.

IS300 is bit heavy [1547kg]. One of the most simple ways to improve acceleration is to reduce weight. We go to node 'pvehicle', expand 'default', then 'cars', 'racers' and go to 'is300'. Middle window will display all values associated to the currently selected node and its element. MASS value will be 1547 meaning that car weighs 1547 kilograms. Below the Value display there is offsets displayed - 'bin:0x31598' in this case. To change that, which is possible only via Ferrari Modloader, you need to go to the created ATTRIBUTES.mwps and insert this line:

patch float bin:0x31598 700

The above patching script will overwrite default offset value of 1547 at address bin:0x31598 with new value of 700. In game it will make the car lighter which will make it noticeably faster since the same amount of power will be used to propel object with lower mass. Worth noting is that 'pvehicle' values are for both stock and upgraded car. This means that mass for example will remain the same regardless of performance. With pvehicle patching it's possible to change things like number of upgrades [not advised], how cops call the cars and engine audio values to make car sound different.

Now for some basic stuff with transmission. This step will show how to increase top speed by changing only one value. Go to the following path: 'transmission/default/is300'. Find field named 'FINAL_GEAR'. This determines the maximum speed that car can reach. Setting this is different than most values since the lower the value the higher the top speed. Top speed however depends on many values like gear ratios and RPM. Improper transmission modifications can seriously impact car performance. Now to increase that top speed. Stock value is 3.7. In game the stock top speed is 268km/h [~166.5MPH] which is quite modest in the game. To make it more it's necessary to DECREASE the FINAL_GEAR value. To do this add the following line in the ATTRIBUTES.mwps file:

patch float bin:0x1e284 3.2

Decreasing by 0.1 should increase the top speed by about 10km/h. Therefore above value should make top speed bigger by about 50km/h. To add up - if top speed is 200km/h and FINAL_GEAR is 4.0 then 390km/h top speed will be achieved by decreasing the FINAL_GEAR value by 1.9. Give or take 0.20 since it's not super precise and should be checked by launching the game and personally ascertaining that. Setting up gear ratios is rather complicated and should be done with help of programs that can create graphs/charts like Ms Excel or similar.

Now that the car is lighter and has some better top speed it's time to increase overall acceleration. Cars in NFS Most Wanted [as Excel charts show it] have pretty unrealistic torque curves. But that doesn't really matter in an arcade game. There are few rules to keep in mind when setting up torque values: - values can NEVER be identical - they CANNOT only rise - starting at too high or too low values will make the car undriveable or simply too slow - at least 2 final values need to be decreasing assuming that 7th is peak, 8 is lower than 7th, and 6th is bit lower than 7th - gaps between torque values are the actual power increase rate that makes the car move; too small gaps won't give good acceleration while too big will make the car too hard to control

Example of torque values for upgraded, non-junkman Porsche Carrera GT which has the most optimal torque curve in the game [unit used is ft-lb]:

165; 249; 369; 483; 553; 503; 464; 435; 419 +84 +120 +114 +70 -50 -39 -29 -16

Torque for Mercedes CLK500: 242; 374; 660; 748; 682; 572; 495; 435; 385 +132 +286 +88 -66 -110 -77 -60 -50

Note: numbers below ft-lb values are differences in torque curve regarding previous values

Worth noticing is that CLK500 has got pretty impressive power and it starts with a lot of torque. Unfortunately it loses a lot of power quickly. Peak vs final value for Mercedes is over 360 ft-lb while Carrera GT loses only ~140 ft-lb. Simple deduction is that the less power the car loses the faster it will reach the top speed. Therefore Mercedes might be good for drag races but Carrera GT will do better in long distance races. That is also determined by Carrera's lower lower mass [1400kg; CLK500 1629kg] and higher RPM limit with Carrera's red line of 8400 and Mercedes' 6700. Lower RPM engines tend to be more powerful but they lose lots of power. Exotics have less strong engines but they are more efficient. At least that's how it looks in game. Now to put it into hexadecimal gamedate. Navigate to the following node path: 'engine/default/is300'. You'll see a list of fields like engine_braking, idle and torque. Field set that will be discussed for now is torque. After expanding it you can see that it consists of 9 more sub-fields each with a certain float type value. Defaults are:

119; 151; 194; 235; 232; 216; 194; 178; 167 +32 +43 +41 -3 -16 -22 -16 -11

Easy enough to notice that this engine isn't powerful since torque values don't reach high numbers and start very low. But such power output is quite enough considering that first step in modification was decreasing the mass over two times. Therefore light cars like Lotus Elise or Fiat Punto don't need very high torque to be fast. Upgraded, Lotus starts with 108 and has peak value of 284ft-lb. Not much if you don't take 861kg mass into account. Also it loses only 58ft-lb in peak vs final torque which makes its engine very efficient. Offsets for engine torque are simple to figure out. Only 1st field is needed to figure out the rest and following fields are first offset +4 up till the final 9th value. Hexadecimal sequence for stock IS300 torque looks as follows:

patch float bin:0x13398 119 patch float bin:0x1339c 151 patch float bin:0x133a0 194 patch float bin:0x133a4 235 patch float bin:0x133a8 232 patch float bin:0x133ac 216 patch float bin:0x133b0 194 patch float bin:0x133b4 178 patch float bin:0x133b8 167

Fastest way to make a car faster is to simply increase torque values at each point by identical value; 30 for example. Car will accelerate faster but its engine will gain/lose power in the same way as previously since the curve is only moved upwards. Another method of increasing top speed is to increase max RPM and red line values. Note that both stock and upgraded values should be identical for this change to take any effect in game. Max RPM in game isn't limited but values above 10000 will not allow for engine to be blown and will also move gear shifting points up. Optimal and recommended gap between red line and max RPM is 1000. So if red line is 7600 then max RPM should be 8600. Bigger gaps shouldn't affect general performance but will increase time needed to reach top speed from 6th gear.

The previously mediocre in performance Lexus is now lighter, has better top speed and acceleration. Now it's time to make it handle better. As a matter of fact decreasing mass on the car did give satisfying results when it came to handling. But in a fierce police pursuit car light like this will be very easy to overtake and push to the wall or balustrade so it would be a good idea to eventually keep it heavier. Return to the first offset that was used to patch IS300 mass to 650kg and change it back to 1547. This will make it slower and handle worse but will make it harder to push off during pursuits. Other way of making it a road hugger and corner-cutter is by increasing tire grip. Navigate to the following path in VLTedit: 'tires/default/is300'. List of fields like tire_grip*, tire_upgrade#* and steering will appear. Those fields are very crucial if you want your car to handle good and stick to the road. Best and most convenient, yet time consuming, way is to write down offsets and values belonging to all fields starting with 'tires_upgrade'. To make it easier I'll write down whole list with comments for stock IS300 tire values. Each field has 2 values so they are written in pairs. First value's offset is given. Offset for next value in the same field is 'given offset +4'. 1st value is for front and 2nd is for rear so dependant on drive type those values can vary.

## tires_upgrade1* patch float bin:0x22848 1 patch float bin:0x2284c 1

## tires_upgrade2* patch float bin:0x22850 1.4 patch float bin:0x22854 1.42

## tires_upgrade3* patch float bin:0x22868 1.6 patch float bin:0x2286c 1.65

In order to quickly improve grip above values can be increased by 0.25 for satisfactory results.

'tires_upgrade' field values don't differ significantly from car to car and it's also possible to increase grip by modifying 'tire_grip*' field sub-fields.

## tire_grip*; stock patch float bin:0x22838 0.1 patch float bin:0x2283c 0.2 patch float bin:0x22840 0.4 patch float bin:0x22844 0.5

If you want to feel a major difference in grip then above values should be doubled.

One value that controls how fast you car responds to controller signals is in 'steering' field. This value dependant on current number shouldn't be larger than 1.15 or lower than 0.9. The bigger the value the faster the car responds and the smaller the turning circle. Lower values do the opposite - car responds slower and has larger turning circle. Steering ratio that will be too small or too big will make the car undriveable.

So far the modified performance for stock IS300 looks quite promissing. I will cover 2 more important matters: brakes and chassis.

First off are brakes. Generally the faster a car can go the quicker it should be able to brake. Navigate to the following path: 'brakes/default/is300'. Only 3 values control brake behaviour and power and those are in fields named: brakes, brakes_BHP and brake_lock.

Field 'brakes' controls overall hydraulic power distribution to brake blocks. The larger these values are the shorter the braking distance will be. Note that difference between front and rear should be within 75 and 175 dependant on car mass. Front should have values smaller than rear. Offsets are as follows:

## brakes patch float bin:0x242b8 300 patch float bin:0x242bc 425

Brakes_BHP field controls power given to brakes dependant on vehicle mass and engine power. So the faster the car the more power will be needed to stop it effectively. Offset is as follows:

## brakes_BHP patch float bin:0x242c0 475

Brake_lock field values control how power from above brakes_BHP field is multiplied and distributed to front and rear brakes. To have more powerful brakes you can either slightly increase multipliers or increase brakes_BHP value. Offsets for brake_lock ratios are as follows:

## brake_lock patch float bin:0x242b0 1 patch float bin:0x242b4 3

Note that proportion for locks shouldn't be lower than 0.27 or higher than 0.40. Otherwise car will be tough to handle or will brake hard enough to work as reset car position which isn't desired in race or means hard times in police pursuit.

Final matter in this tutorial is chassis data. It's as important as engine or tires. Navigate to the following path: 'chassis/default/is300'. You'll see a list of fields like wheel_base, drag_coefficient and roll_center. I'll write down a list of all named values [identified by proper names] and offsets for stock IS300:

## wheel_base patch float bin:0x9248 2.77

## drag_coefficient patch float bin:0x9264 0.29

## ride_height patch float bin:0x920c 8 patch float bin:0x9210 8

## roll_center patch float bin:0x9244 10

## track_width patch float bin:0x9214 1.534 patch float bin:0x9218 1.544

There are some fields that aren't normally named but I'm still researching those to find out what they change exactly. So now I'll explain how fields listed above affect performance, what they really mean and how to properly change them.

Wheel_base - game uses meters; horizontal distance between the center of the front wheel, and the center of the rear wheel; decrease values to get smaller turning circle and thus quicker handling

Drag_Coefficient - aerodynamic drag produced by car movement; the faster the car moves the more drag it will make and top speed will take longer to reach; decrease for better acceleration at high speeds

Ride_height - in inches; logical height of the car body regarding wheels; decrease values to improve handling but don't go below 3, otherwise car will be scratching the road and lose a lot of speed in the process

Roll_Center - probably in inches; logical vertical center of gravity; decrease to make the car literally stick to the road by lowering its center of gravity; setting to 1 or 0 will make it super stable and improve handling

Track_width - in metres; width of front and rear axles; not sure how affects overall handling but might affect car stability

--------------------------------------- ---------------------------------------

That's about it for basic car modding. Congratulations if you managed to read through this tutorial. More advanced stuff will be covered on forum by demand.

Best regards and luck with car modding

-- DanielKeller

Wednesday, May 16, 2018

How to convert a NFS Shift car to NFSMW (old modtools)

Credits go to Aileron, original post from the old site (GTR/DrivingPassion & Racing Division)

Let''s start.

Things you need:

  1. NFS Shift or NFS Shift Demo
  2. ZModeler 1.07b
  3. ZModeler 2.x.x with NFS Shift import filter.
  4. Any image editing program that has .DDS filter. Paint.net is the best because it is fast and free, but this new version has a lot of bugs. If you don''t have older version, use other program.
  5. Bytesss''s Advanced control trainer.
  6. Of course, Arushan''s mod tools.

1st step: Importing

You can learn how to correctly import a shift geometry file here: http://forum.zmodeler2.com/viewtopic.php?t=4147

2nd step: Preparing the mesh

In this tutorial I will convert Mazda RX-7. Once you imported the mesh, press right click on RX7. Then linking/unlink children. Then delete RX7 because it doesn''t contain files you need.
Delete next parts with all of its subfiles because you don''t need them:
  • a_rx7_tire_lr
  • a_rx7_tire_lf
  • a_rx7_tire_rr
  • a_rx7_kit00_lightglows_r
  • a_rx7_kit00_lightglows_f
  • a_rx7_wheel_lf
  • a_rx7_wheel_lr
  • a_rx7_wheel_rr
  • a_rx7_caliper_lf
  • a_rx7_disc_lf
  • a_rx7_disc_lr
  • a_rx7_caliper_lr
  • a_rx7_kit02_lightglows_f
  • a_rx7_kit08_lightglows_r
First thing on my list is called "a_rx7_kit00_interior". Click +, then + on "a_rx7_kit00_interior_loda". Finally you will see file called "a_rx7_kit00_interior_loda" that doesn''t have any subfiles. Right click on it and then go to linking/unlink. Next delete "a_rx7_kit00_interior" with all of its subfiles because you don''t need it anymore. Then unselect "a_rx7_kit00_interior_loda" to prevent messing things up (You can easily make errors when attaching parts later, so I recommend you to unselect it.) Then do the same thing with all of the rest parts.

Now you have to reduce number of parts. Some parts might be necessary for multiple bigger parts, so you dont want to attach them too early.
  1. Merge all bumpers that are in the same kit (example: attach "a_rx7_kit03_bumper_r_loda" to "a_rx7_kit03_bumper_f_loda")
  2. Attach "a_rx7_tire_rf_loda" to "a_rx7_wheel_rf_loda" and rename it to kit00_front_tire_a.
  3. Attach "a_rx7_caliper_rr_loda" to "a_rx7_disc_rr_loda" and rename it to kit00_rear_brake_a. Do the same thing with "a_rx7_caliper_rf_loda" and "a_rx7_disc_rr_loda" and rename it to kit00_front_brake_a.
  4. Attach left side mirror to right side mirror and rename it to base_a. Base_a is a necessary part that is going to show on all bodykits.

Now lets work on bodykits.
Hide all parts except "a_rx7_kit00_lights_loda". Go to Create/copy. Then rename the copy to kit00_body_a. We need to copy it becase we need it for few bodykits. Copy "a_rx7_kit00_interior_loda" and attach it to kit00_body_a. (Modify/Attach) Then do the same thing for next parts (later we will delete unnecessary backup files):
  • a_rx7_kit00_chassis_loda
  • a_rx7_kit00_boot_loda
  • a_rx7_kit00_steeringwheel_loda
  • a_rx7_kit00_bonnet_loda
  • a_rx7_kit00_engine_loda
  • a_rx7_kit00_body_loda
  • a_rx7_kit00_bumper_f_loda (actually this part is attached front and rear bumpers)

Now you have stock bodykit:


Now we are making kit01_body_a.
We will use parts that include "kit03". Don''t get confused with "a_rx7_kit02_lights_loda". We will use it in one of the next kits.
Parts we use:
  • a_rx7_kit03_steeringwheel_loda
  • a_rx7_kit03_chassis_loda
  • a_rx7_kit03_interior_loda
  • a_rx7_kit03_upgrades_loda
  • a_rx7_kit03_bumper_f_loda (bumpers with skirts)
Backup these files too because you might need tehm in next bodykit(s). After you backuped them, attach them to each other. Then rename it to kit01_body_a. Now, as you can see, we don''t have all parts of this bodykit. That means we have to use parts from pervious bodykit. Make copies of this files and attach them to kit01_body_a:
  • a_rx7_kit00_lights_loda
  • a_rx7_kit00_boot_loda
  • a_rx7_kit00_bonnet_loda
  • a_rx7_kit00_engine_loda
  • a_rx7_kit00_body_loda.
If you did everything right, you will get this:

Next bodykits won''t have parts that are worse than parts in kit1. So now you can delete next backuped files:
  • a_rx7_kit00_steeringwheel_loda
  • a_rx7_kit00_interior_loda.

Next is bodykit 2.
Since there is no parts with kit04, in its name, we will use parts that include kit05. The only part that includes kit05 is a_rx7_kit05_boot_loda, so rename it to kit02_body_a.
Again, we need parts from previous bodykit(s). Use parts you used on previous bodykit, except a_rx7_kit00_boot_loda. Of course, make their backups and backup a_rx7_kit05_boot_loda. Now you can delete a_rx7_kit00_boot_loda. And you can delete a_rx7_kit00_chassis_loda and a_rx7_kit00_bumper_f_loda. We don''t need them anymore. Once you attached all of that parts, you have kit02_body_a finished.

Parts for next bodykit include kit06. So we will use this parts:
  • a_rx7_kit06_bumper_r_loda (bumpers and skirts)
  • a_rx7_kit06_bonnet_loda
  • a_rx7_kit06_chassis_loda
  • a_rx7_kit06_upgrades_loda
  • a_rx7_kit06_interior_loda
Backup and attach them to each other. Rename the final part to kit03_body_a.
Now we must add parts from previous bodykit. As you can see, a_rx7_kit00_lights_loda doesn''t fit with configuration of current WIP kit. So we can delete it and from now we will use a_rx7_kit02_lights_loda. Also, delete a_rx7_kit00_bonnet_loda because we don''t need it anymore. Sorry, I forgot to delete these parts:
  • a_rx7_kit03_chassis_loda
  • a_rx7_kit03_interior_loda
  • a_rx7_kit03_upgrades_loda
  • a_rx7_kit03_bumper_f_loda
Now backup and attach these parts to kit03_body_a:
  • a_rx7_kit00_body_loda
  • a_rx7_kit00_engine_loda
  • a_rx7_kit03_steeringwheel_loda
  • a_rx7_kit02_lights_loda
  • a_rx7_kit05_boot_loda

Next bodykit has parts that include kit08. Backup and attach following parts:
  • a_rx7_kit08_bonnet_loda
  • a_rx7_kit08_body_loda
  • a_rx7_kit08_chassis_loda
  • a_rx7_kit08_bumper_f_loda (both bumpers)
Rename the whole part to kit04_body_a.
Now backup and attach these parts from previous bodykits:
  • a_rx7_kit00_engine_loda
  • a_rx7_kit03_steeringwheel_loda
  • a_rx7_kit02_lights_loda
  • a_rx7_kit05_boot_loda
  • a_rx7_kit06_upgrades_loda
  • a_rx7_kit06_interior_loda
Now you can delete next parts:
  • a_rx7_kit00_body_loda
  • a_rx7_kit06_bumper_r_loda
  • a_rx7_kit06_bonnet_loda
  • a_rx7_kit06_chassis_loda
For next bodykit we will use next parts:
  • a_rx7_kit10_bumper_r_loda (bumpers)
  • a_rx7_kit10_chassis_loda
  • a_rx7_kit10_steeringwheel_loda
  • a_rx7_kit10_upgrades_loda
  • a_rx7_kit10_interior_loda
  • a_rx7_kit10_boot_loda
  • a_rx7_kit10_body_loda
  • a_rx7_kit10_bonnet_loda
Attach them to each other and rename them to kit05_body_a. You don''t have to backup them because this is the last bodykit. Then attach a_rx7_kit02_lights_loda and a_rx7_kit00_engine_loda to kit05_body_a. Delete every unnecessary part.
Now you must rotate your car for 180 degrees. Switch any window to top view. Show all parts. Then Select/All. Turn on Selected mode. Then go to modify/rotate.
Next you must low your car because it is too high. Switch to left or right and them low it a lil bit. BEWARE! Disable X. You must move it only in Y direction. After you finish that go to select/none and turn of selected mode.
Now switch to top view. You must place brakes and wheel exactly in the middle. Look at the red cude in the middle. That''s the center. Place them to look like this:


Now you''re done with preparing beta mesh.

3rd step: Preparing textures

Open your .z3d.
Go to textures browser. It is located near materials editor under "Help".
You will see a bunch of textures, but we don''t need all of them. First texture we need is:
tread_michelin_street1_diffuse_00
Select it and click save. Save it anywhere and name it as "TREAD" (You must use Caps Lock). Later we will move all textures to required folder. Now do the same thing with following textures:
  • mazda_rx7_wheel_diffuse_00 and name it as TIRE
  • mazda_rx7_misc_diffuse and name it as MISC
  • mazda_rx7_lights_glow and name it as KIT00_BRAKELIGHT_ON
  • mazda_rx7_lights_diffuse and name it as KIT00_BRAKELIGHT_OFF
  • mazda_rx7_interior_diffuse and name it as INTERIOR
  • mazda_rx7_engine and name it as ENGINE
  • mazda_rx7_badging_diffuse and name it as BADGING
  • generic_steeringwheel_momo_mod88_loda_diffuse and name it as TIRE_N
  • generic_steeringwheel_momo_mod80_loda_diffuse and name it as BADGING_N
  • generic_cockpit_upgrades01_loda_diffuse and name it as INTERIOR_N
  • common_grille02_diffuse and name it as LOGO
  • common_disk01_diffuse and name it as RIM
  • common_chassis_diffuse and name it as MISC_N
That''s all with textures we need. Later we will add driver texture.
Now you need photoshop or any other image editing/converting software that has .DDS plug-in. You need to compress this .DDS textures:
  • TREAD as DXT1
  • TIRE as DXT1
  • MISC as DXT1
  • KIT00_BRAKELIGHT_ON as DXT1
  • KIT00_BRAKELIGHT_OFF as DXT1 (if you have headlight or brakelight glasses save them as DXT3)
  • ENGINE as DXT1
  • BADGING as DXT3
  • TIRE_N as DXT1
  • BADGING_N as DXT1
  • INTERIOR_N as DXT1
  • LOGO as DXT3
  • TIRE as DXT1
  • MISC_N as DXT1

4th step: Putting the car in mod tools

Create a new folder and name it mazda or however you want. Then put .z3d and textures in it. After that copy mod tools to your folder. Now go to folder/nfsmw mod tools/zmodeler/mwrawfilter.zmf Copy that file to Zmodeler1 directory/filters.
Next go to nfsmw-modtools\\ferrari360\\output\\CARS_REPLACE\\SL65. Delete all files inside except CAR.ini. Open CAR.ini with notepad and do this:

[car]
name=Mazda RX-7
manufacturer=MAZDA
internal=rx7       <-- because I will replace RX-7 from Most Wanted
modloader=0.2


Save and close it. Next rename folder SL65 to RX7. After that delete textures 360misc, 360tire and 360badging in ferrari360 folder.
Now right click on build.bat and left click on edit. Make it look like this:

@echo off
echo =====================================================
echo Compiling Textures...
echo =====================================================
..\bin\mwtc.exe texdefn.txt
..\bin\\texpatch output\FRONTEND\\MANUFACTURERS\6-MAZDA.BIN "CARSELECT_MANUFACTURER_MAZDA"
..\bin\texpatch output\CARS_REPLACE\RX7\SECONDARYLOGO.BIN "SECONDARY_LOGO_RX7_1"
echo.
echo =====================================================
echo Compiling Model...
echo =====================================================
..\\bin\\mwgc -nowait -xname "RX7" -matlist "matlist360.txt" -xlink "xlink360.txt" -source "mw360.mwr" -target "output\CARS_REPLACE\RX7\GEOMETRY.BIN"
echo.
echo =====================================================
echo Complete.
echo =====================================================
pause


In case your car is not a Mazda, here are all manufacturer numbers:

 Aston Martin-21
 Audi-5
 BMW-1
 Cadillac-24
 Chevrolet-19
 Corvette-25
 Dodge-8
 Fiat-23
 Ford-2
 General Motors-7
 Lamborghini-15
 Lexus-17
 Lotus-14
 Mazda-6
 McLaren Mercedes-11
 Mercedes-Benz-12
 Mitsubishi-10
 Pontiac-18
 Porsche-4
 Renault-16
 Subaru-3
 Toyota-9
 Vauxhall-20
 Volkswagen-22.

Now cut all textures and paste them to Mazda RX-7/nfsmw-modtools/ferrari360.
Next open texdefn.txt and modify it to look like this:


 [tpk]
 Identifier=CARTEXTURES
 PipelinePath=Global\Pipeline\CarTemplateTextures_RX7.tpk
 XName=RX7
 Output=output\CARS_REPLACE\RX7\TEXTURES.BIN
 
 [texture]
 Name=MISC
 File=MISC.dds
 
 [texture]
 Name=TIRE
 Usage=Type1
 File=TIRE.dds
 
 [texture]
 Name=BADGING
 File=BADGING.dds
 
 [texture]
 Name=ENGINE
 File=ENGINE.dds
 
 [texture]
 Name=BADGING_N
 File=BADGING_N.dds
 
 [texture]
 Name=INTERIOR
 File=INTERIOR.dds
 
 [texture]
 Name=INTERIOR_N
 File=INTERIOR_N.dds
 
 [texture]
 Name=KIT00_BRAKELIGHT_ON
 File=KIT00_BRAKELIGHT_ON.dds
 
 [texture]
 Name=KIT00_BRAKELIGHT_OFF
 File=KIT00_BRAKELIGHT_OFF.dds
 
 [texture]
 Name=LOGO
 File=LOGO.dds
 
 [texture]
 Name=MISC_N
 File=MISC_N.dds
 
 [texture]
 Name=RIM
 File=RIM.dds
 
 [texture]
 Name=TIRE_N
 File=TIRE_N.dds
 
 [texture]
 Name=TREAD
 File=TREAD.dds


Now open xlink360. Don''t delete anything. Just copy this five times:

 KIT00_BODY_B=KIT00_BODY_A
 KIT00_BODY_c=KIT00_BODY_A
 KIT00_BODY_D=KIT00_BODY_A
 KIT00_BODY_E=KIT00_BODY_A

and rename it to

 KIT01_BODY_B=KIT01_BODY_A
 KIT01_BODY_c=KIT01_BODY_A
 KIT01_BODY_D=KIT01_BODY_A
 KIT01_BODY_E=KIT01_BODY_A
 
 KIT02_BODY_B=KIT02_BODY_A
 KIT02_BODY_c=KIT02_BODY_A
 KIT02_BODY_D=KIT02_BODY_A
 KIT02_BODY_E=KIT02_BODY_A

 KIT03_BODY_B=KIT03_BODY_A
 KIT03_BODY_c=KIT03_BODY_A
 KIT03_BODY_D=KIT03_BODY_A
 KIT03_BODY_E=KIT03_BODY_A

 KIT04_BODY_B=KIT04_BODY_A
 KIT04_BODY_c=KIT04_BODY_A
 KIT04_BODY_D=KIT04_BODY_A
 KIT04_BODY_E=KIT04_BODY_A

and

 KIT05_BODY_B=KIT05_BODY_A
 KIT05_BODY_c=KIT05_BODY_A
 KIT05_BODY_D=KIT05_BODY_A
 KIT05_BODY_E=KIT05_BODY_A
 
and finally save your file.
Next we need to compile matlist360.txt. But we can''t do that because material names are too long. So we are going to cut them. Open mazda.z3d. Go to materials editor (red ball under help button). Now rename materials (mazda_rx7_interior (vehicles_basic,VehicleBasic) to mazda_rx7_interior, generic_chassis (vehicles_basic,VehicleBasic) to generic_chassis, etc.). Then click hide all and then show all parts (because of a zmodeler bug). After that click save and close zmodeler2. Now we can work on matlist.
Open matlist360.txt. Delete everything in it. Now copy all material names from .z3d file. Every material has to be in it''s own row.
Now we will assign shaders to this materials. After shaders we need to assign textures. Here is the list of all available shaders:

0xD6D6080A <-- body paint
0x5BC3A3C <-- texture brakelights | If you use them you must assign this texture for it: 0x2B52399 and you must have textures KIT00_BRAKELIGHT_ON and OFF
ALUMINUM
BOTTOM
BRAKEDISC
BRAKELIGHT
BRAKELIGHTGLASS
BRAKES
CALIPER
CALIPERDECAL
CARBONFIBER
CARBONFIBER2
CHAR_CLOTH
CHAR_HAIR
CHAR_LATEX
CHAR_LEATHER
CHAR_PLASTIC
CHAR_RUBBER
CHAR_SKIN
CHROME
CLEARPLASTIC
DECAL
DEFAULT
DIABLOHP
DRIVER
DRIVERHEAD
DULLENGINE
DULLPLASTIC
ENGINE
EXHAUST_TIP
GOLDROTOR
GRILL
HEADLIGHT
HEADLIGHTGLASS
HEADLIGHTREFLECTOR
HOSES <-- damage scratches
INTERIOR
LICENSEPLATE
MAGCHROME
MAGGUNMETAL
MAGSILVER
MAGSILVERGLOSS
MATTEPLASTIC
MESH
METPAINTBLACK
METPAINTBLUE
METPAINTGOLD
METPAINTGRAY
METPAINTGREEN
METPAINTRED
METPAINTSILVER
METPAINTYELLOW
MIRROR
MOLDINGS
PEARL
PLAINNOTHING
PLASTICHUBCAP
RAD
REGPAINTBLACK
REGPAINTBLUE
REGPAINTGRAY
REGPAINTGREEN
REGPAINTORANGE
REGPAINTPINK
REGPAINTRED
REGPAINTWHITE
REGPAINTYELLOW
RIMPEARL
ROAD
RUBBER
SHINYMOLDINGS
SHINYPLASTIC
TRAFFIC
TRAFFICWINDOWS
USER_CALIPERS
USER_EXHAUST
USER_EXHAUST2
USER_HOSES
USER_RIMS
USER_RIMS_CHROME
USER_RIMS_GLOSS
USER_RIMS_GUNMETAL
USER_RIMS_MAGSILVER
USER_RIMS_MET
USER_RIMS_SILVERGLOSS
USER_SPOILER
WHEELBLUR
WHITE
WINDOWMASK
WINDSHIELD


Now textures. If you use internal textures you must write "x_" in front of texture''s name. If you use textures from GlobalB.lzc you mustn''t write anything in front of it''s name. Separate materials from shaders by writing "=" between them and separate shaders from textures by writing "/" between them with NO SPACE BETWEEN them.
Here is my matlist:

 mazda_rx7_interior=INTERIOR/x_INTERIOR
 generic_chassis=BOTTOM/x_MISC_N
 mazda_rx7_misc=DULLPLASTIC/x_MISC
 mazda_rx7_paint=0xD6D6080A/x_SKIN1
 mazda_rx7_badges=DULLPLASTIC/x_BADGING
 mazda_rx7_lights=0x5BC3A3C/0x2B52399
 generic_windows=WINDSHIELD/WINDOW_FRONT
 generic_gloss_black=DULLPLASTIC/WINDOW_MASK
 mazda_rx7_engine=ENGINE/x_ENGINE
 mazda_rx7_wheel_tyre=RUBBER/x_TIRE
 mazda_rx7_tread=RUBBER/x_TREAD
 generic_lightflares
 generic_glass_clear=HEADLIGHTGLASS/WINDOW_FRONT
 generic_carbon=CARBONFIBER/CARBONFIBRE
 mazda_rx7_wheel=MAGSILVER/x_TIRE
 mazda_rx7_wheel_alpha <-- unnecesary material
 mazda_rx7_disc=BRAKES/x_RIM
 generic_cockpit_upgrades_loda=INTERIOR/x_INTERIOR
 generic05_loda=INTERIOR/x_TIRE_N
 generic_grille=GRILL/x_LOGO
 momo_mod80_loda=INTERIOR/x_BADGING_N

Save matlist. Open mazda.z3d and export it to mod-tools/ferrari360/mw360.z3d (zmodeler1 file). Now open the mesh with zmodeler1. In case you don''t have .mwr plug-in copy/cut it from mod-tools/zmodeler and paste it into zmodeler1 directory/filters before opening the file. Export it to mw360.mwr and run build.bat. Now you can test your car.

5th step: Fixing wheel positions and logos

Find FE.MWPS, ATTRIBUTES.MWPS and SECONDARYLOGO.BIN from another addon which replaces the same car. Copy/cut and paste them into mod tools/ferrari360/output/CARS_REPLACE/RX7. Rename 32-FERRARI.BIN from MANUFACTURERS folder to ##-MAKE_OF_YOUR_CAR (in my case 222-NEW_MAZDA) Swap the texturewith your one (It must be 64x64 pixels size and DXT3.) using NFS-TexEd. Edit car.ini and change the name of manufacturer from MAZDA to, in my case NEW_MAZDA. Right click on build.bat and click edit. Change this row:

..\bin\texpatch output\FRONTEND\MANUFACTURERS\6-MAZDA.BIN "CARSELECT_MANUFACTURER_MAZDA"

to (in my case)

..\bin\texpatch output\FRONTEND\MANUFACTURERS\222-NEW_MAZDA.BIN "CARSELECT_MANUFACTURER_NEW_MAZDA"

Manufacturer logo is finished.
Open SECONDARYLOGO.BIN (I don''t need to do this because logos are the same but I''m doing this because most of you won''t convert cars which are already in game.) using NFS-TexEd. Swap the texture with your one (it must be 256x64 pixels size and DXT3). Click save and then exit. Secondary logo is finished.
Open FE.MWPS. Change manufacturer value to 222 (because that is the number of our manufacturer logo file.). You can edit price and required blacklist level if you want. If you don''t want, delete those rows. Save your file. Open ATTRIBUTES.MWPS. Make it look like this:

 ##---------------------------------------------------
 ## 2003 Mazda RX-7
 ## Replacement for Mazda RX-7
 ## Attributes.bin patch script
 ##---------------------------------------------------
 
 memfile GLOBAL\\GlobalMemoryFile.bin
 vpak GLOBAL\\ATTRIBUTES.BIN db
 
 ##---------------------------------------------------
 
 ## TireOffsets
 ## front left
 patch float bin:0x40940 1.25
 patch float bin:0x40944 0.99
 patch float bin:0x40948 0
 patch float bin:0x4094c 0.34
 
 ## front right
 patch float bin:0x40950 1.25
 patch float bin:0x40954 -0.99
 patch float bin:0x40958 0
 patch float bin:0x4095c 0.34
 
 ## rear right
 patch float bin:0x40960 -1.42
 patch float bin:0x40964 -1.03
 patch float bin:0x40968 0
 patch float bin:0x4096c 0.355
 
 ## rear left
 patch float bin:0x40970 -1.42
 patch float bin:0x40974 1.03
 patch float bin:0x40978 0
 patch float bin:0x4097c 0.355
 
 ## TireSkidWidth
 patch float bin:0x40a0c 0.245
 patch float bin:0x40a10 0.245
 patch float bin:0x40a14 0.335
 patch float bin:0x40a18 0.335
 
 ## KitWheelOffsetRear
 patch int8 bin:0x40a38 0
 patch int8 bin:0x40a39 0
 patch int8 bin:0x40a3a 0
 patch int8 bin:0x40a3b 0
 patch int8 bin:0x40a3c 0
 patch int8 bin:0x40a3d 0
 
 ## KitWheelOffsetFront
 patch int8 bin:0x40a46 0
 patch int8 bin:0x40a47 0
 patch int8 bin:0x40a48 0
 patch int8 bin:0x40a49 0
 patch int8 bin:0x40a4a 0
 patch int8 bin:0x40a4b 0

Now you need to change values. First row of tire offsets indicates X and second Y movement of wheels. Third row changes wheels height (DO NOT TOUCH. It must be 0). 4th row changes wheels size. TireSkidWidth changes width of wheels. KitWheelOffsets indicate Y movement of wheels for bodykits. Now save your file and run MW with Bytesss''s trainer (follow instructions in readme.) After you finish with your car, close the game and just copy values to ATTRIBUTES.MWPS.

Next, we''re gonna put liveries as bodykits. Open your .z3d. Hide all parts except kit01_body_a. Go to polygons mode. Go to Select/By Material and choose mazda_rx7_paint. Then go to materials editor. Create a new material and name it to something like "KIT01_LIVERY". Then click "Assign to selection". Repeat this with other 4 kits. Save the file and export it to old .z3d and then to .mwr. Add new materials to matlist. Now it''s up to you to choose the shader for liveries'' material. If you use default body shader you will occur some bugs with paint when painting the car with custom paints (pearlscent, chrome, matte...). If you use CARBONFIBER it won''t have much shine. If you use REGPAINTBLACK it will have too much shine and if you use METPAINTBLACK it will look almost perfect.

Easter Egg

I''ve made one intentional bug in order to teach you how to fix mistakes you might make sometimes. I put side mirrors as base_a. Which means that they won''t be painted if you change the bodykit. So this is how we''re gonna fix it:
Hide all parts except base_a. Go to polygons mode. Select/By Material/mazda_rx7_paint. Click SELECTED MODE. Modify/Submesh/Detach (make sure "keep original" option is not enabled). Now go to the default mode and then Create/Copy and copy this detached part 4 times. Attach each part to an aftermarket bodykit. Then change it''s material using the same method we used in putting liveries as bodykits. Just make sure you deselect everything before selecting body material again.

That''s all, I hope it helps. If you need help PM me. Once you learn converting I suggest these tutorials:
http://gangontheweb.forumotion.com/arg-restricted-tutorials-f30/vltedit-tutorial-t528.htm
http://gangontheweb.forumotion.com/arg-restricted-tutorials-f30/tutorial-making-custom-vinyls-for-mw-t475.htm

Please, don''t abuse this tutorial by using it to reconvert cars which are already converted by other converters unless they are bad.

-Mihailo